What's new

DIY 6th Gen Pollen Filter Howto

AndyB1976

Members
Messages
980
Reaction score
82
Location
Glasgow
Car
2002 F18B2 CG8
Honda Accord 98-02 6th Gen Pollen Filter Replacement.


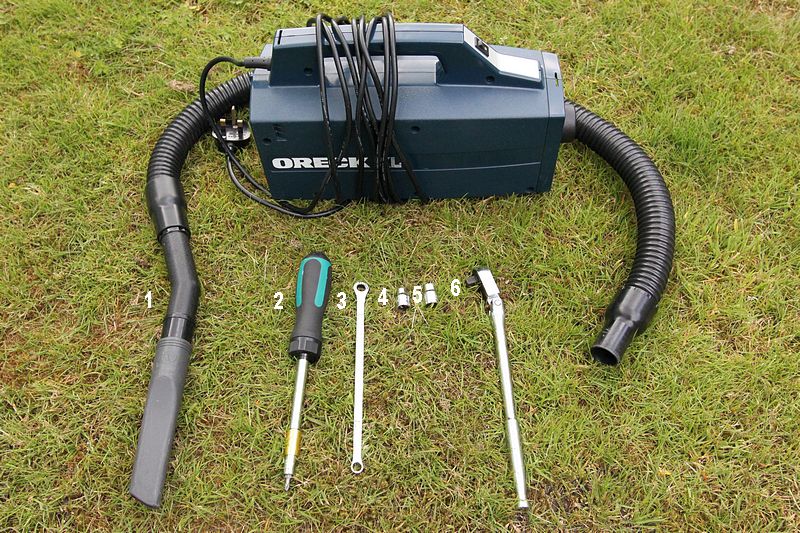
Not many tools are required for this one you'll be glad to hear! Some of the Philips screws on here are external hex headed so you can use a spanner or socket on them. You might find that they are too tight and start to strip the Philips Head or the clearances are more suited to a spanner.


Tool List

1. Vac with Crevice Tool
2. Philips Screwdriver
3. 8mm Spanner
4. 8mm Socket
5. 10mm Socket
6. Ratchet

1atools_tn1_zps2576fc50.jpg


Preliminary steps and info.

The first step I undertake when working on the car around any wiring or electrics is to disconnect the Negative cable. You will need to know your radio code, this should be requested when the power is reconnected. The driver 'Auto' window will also need to be reset.

1bUndoNeg_tn1_zps0a6a6d9a.jpg


Window Reset.

Press window down, when fully down keep the button down for 5 secs. Then pull up on the button, when window fully up keep button up for 5 secs – this should enable 'Auto' window. This is one action, do not let go the button until the very end.


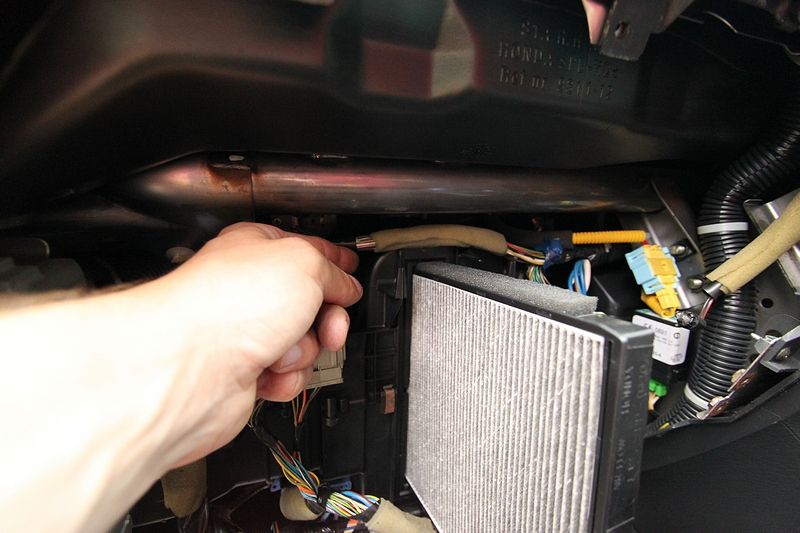
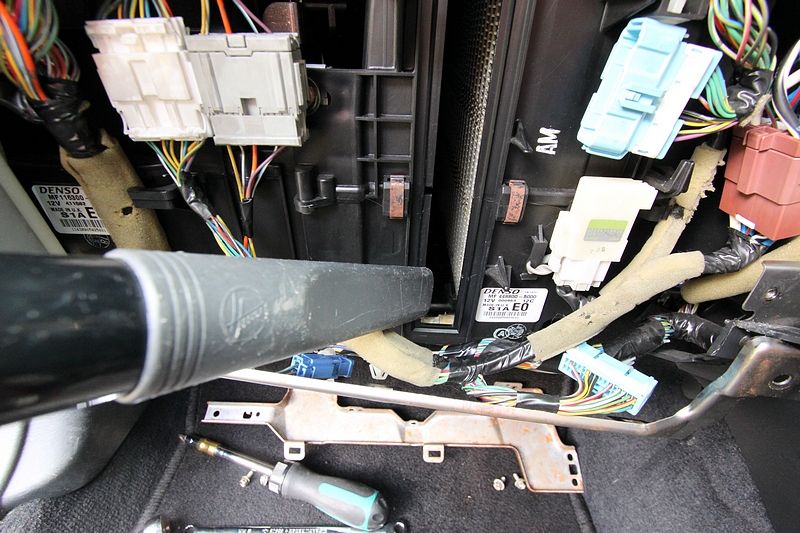
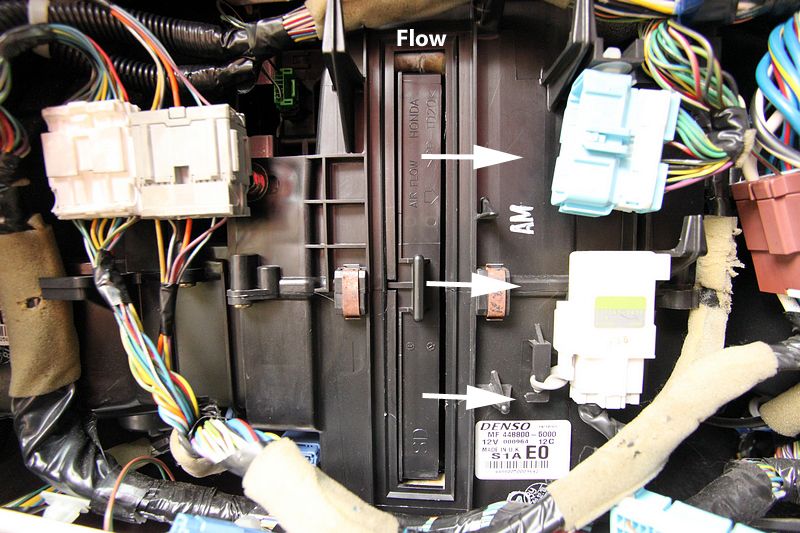
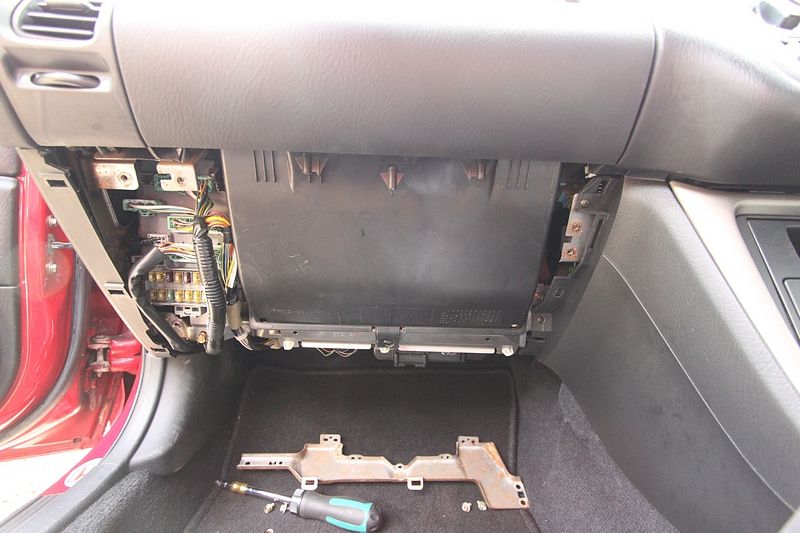
Accessing the Pollen Filter.

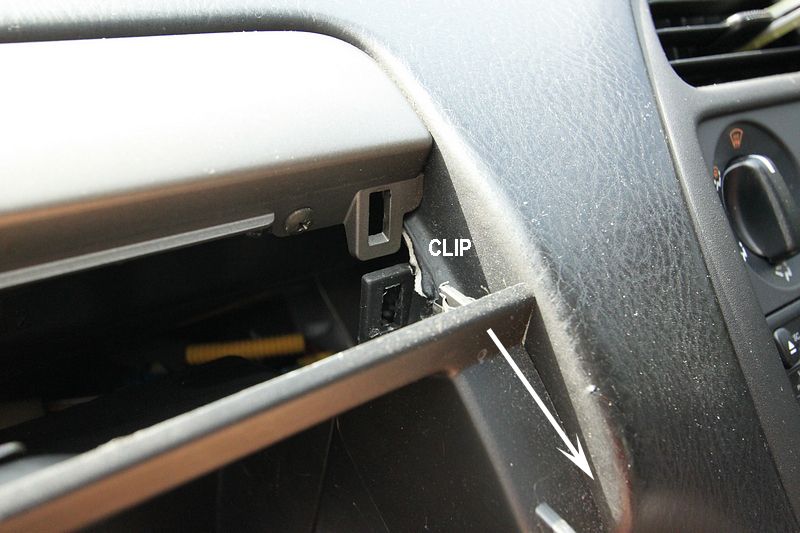
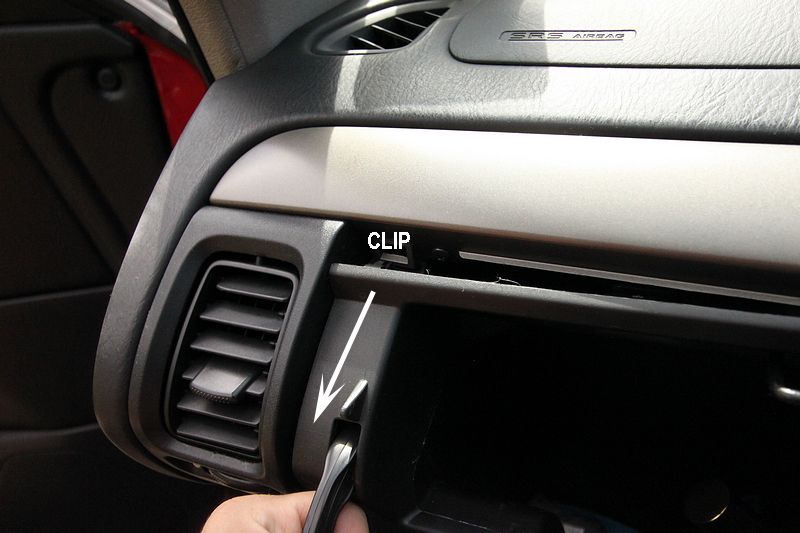
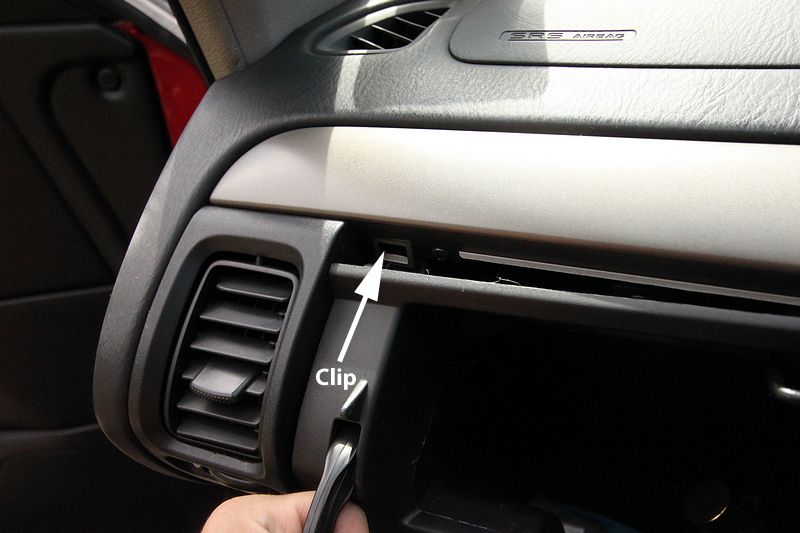
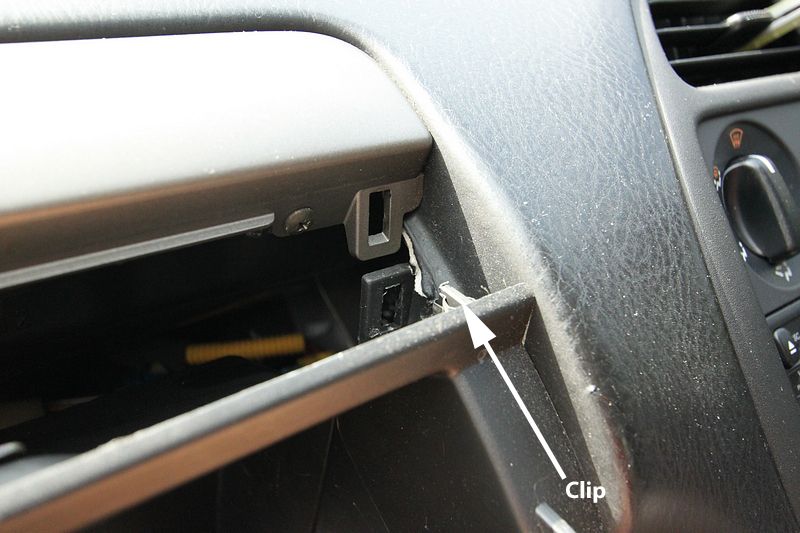
We need to remove the passenger lower panel. This is held on with clips as you can see here.

2aLowerCoverClips_tn1_zps883d6927.jpg


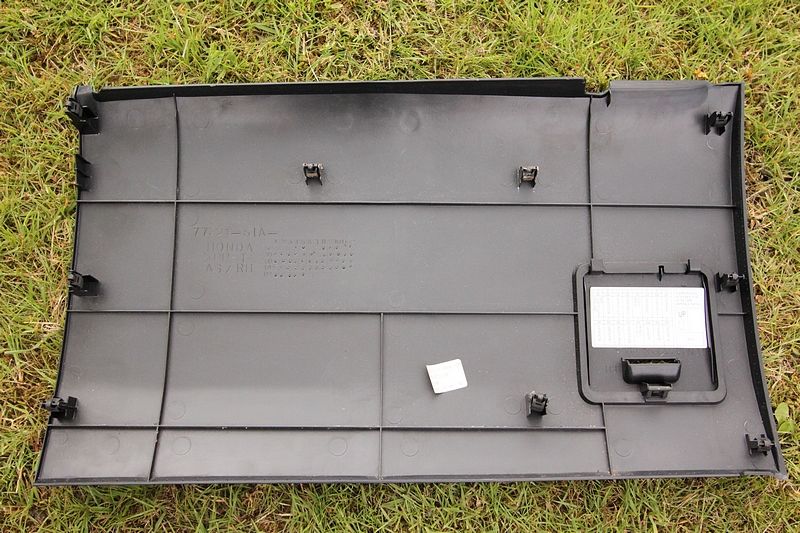
I find grabbing around the base and a sharpish tug will free the panel. NB I am grabbing the base of the panel, not the fuse panel access door.


2pulllowercover_tn1_zps7a35f16a.jpg


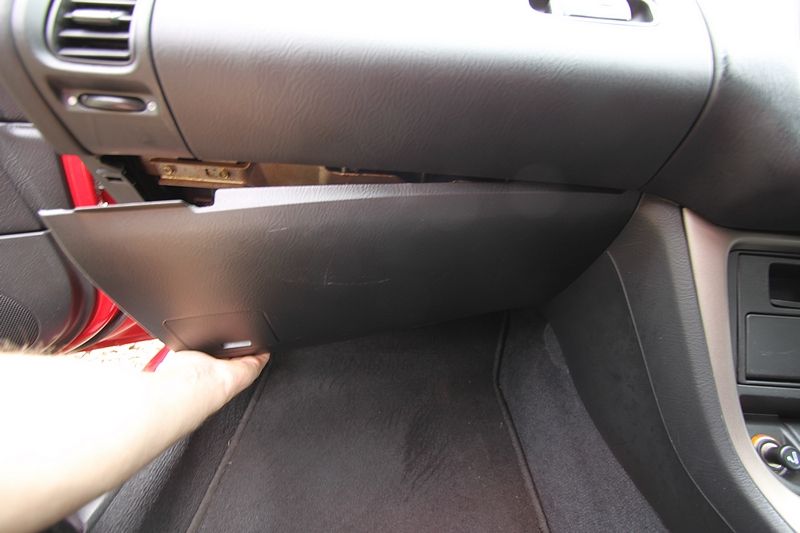
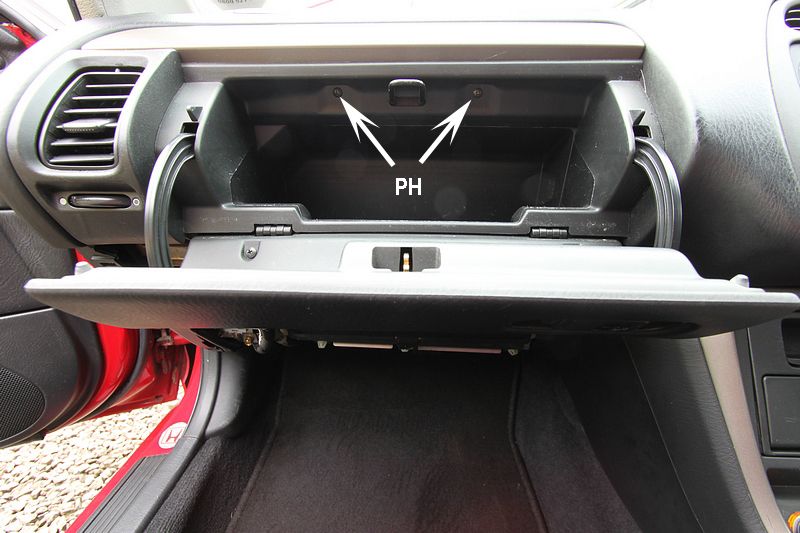
Removing the Glovebox

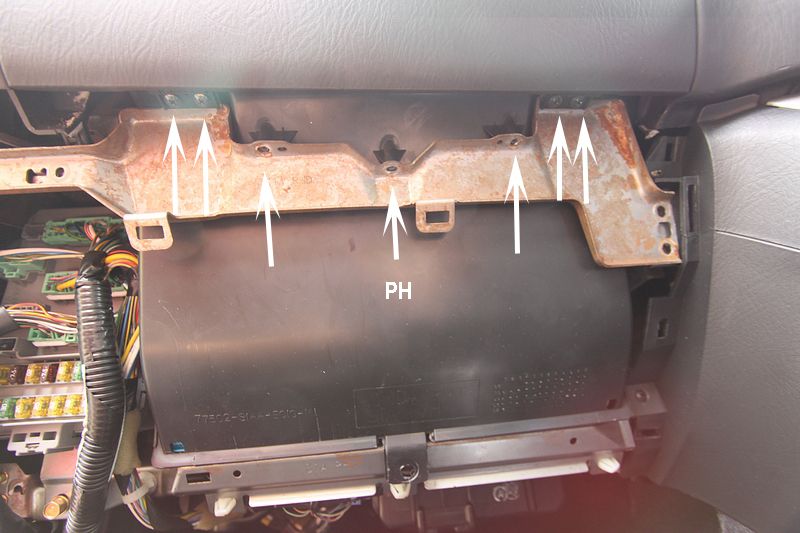
Open the glovebox and remove the two Philips (PH) screws.

31topscrews_tn1copy_zps5702a148.jpg


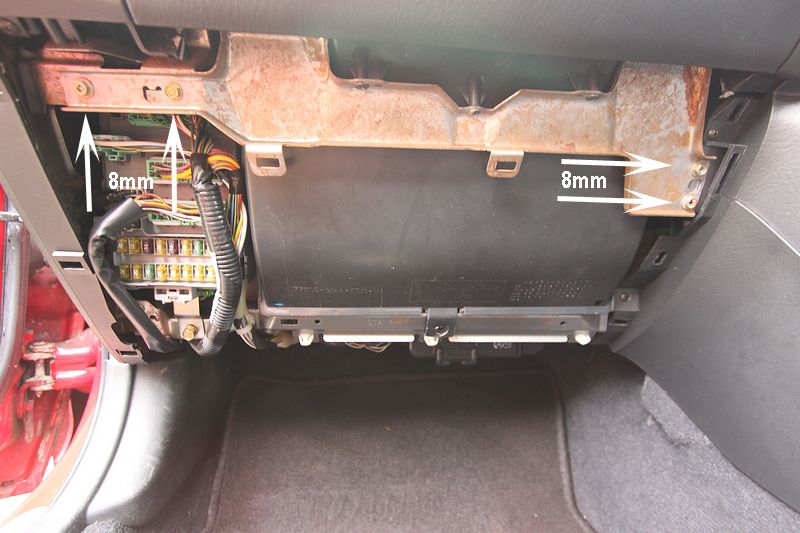
Remove the x4 8mm screws from the upper bracket.

4removebracketbolts_tn1copy_zpsa310db1e.jpg


Remove the x7 Philips screws, then the bracket should be free. Move it out the way.

5removescrews_tn1_zps37ee26ae.jpg


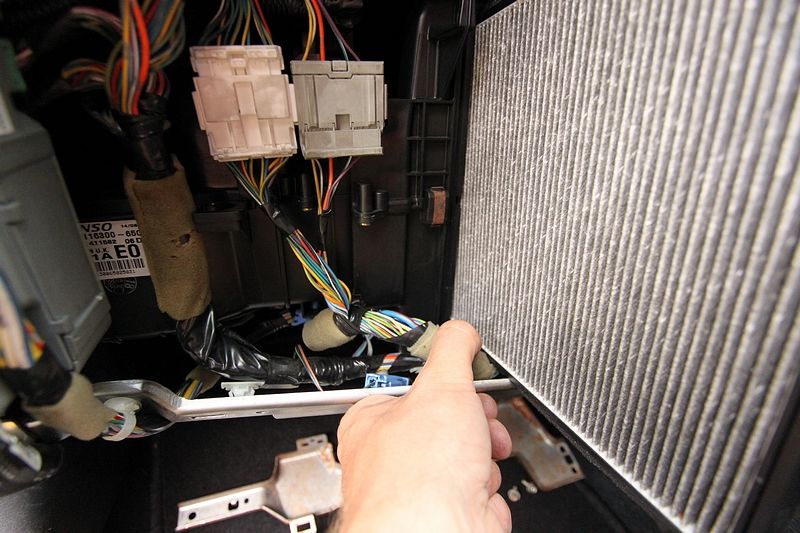
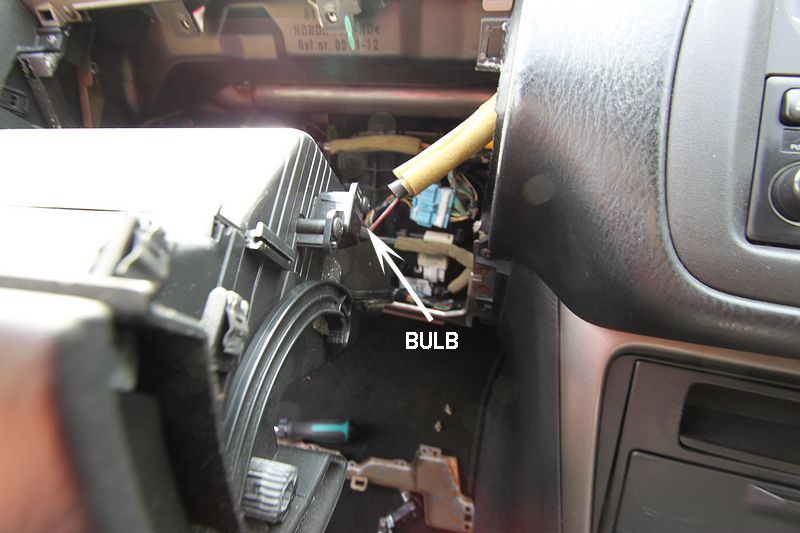
The glovebox should now be free apart from two clips behind it. I found the easiest way to remove it was to open the lid and pull a little on the lid supports. You might have an illuminated glovebox, the bulb and wiring will become visible as soon as freed from clips, therefore as soon as the box is free do not just pull it all the way out..LOOK for the bulb and wiring at the right hand side.

7pullglovebox_tn1copy_zps494df999.jpg


6pullglovebox_tn1copy_zpsaf2de4f4.jpg


27reinsertbulb_tn1copy_zps4f918c6c.jpg


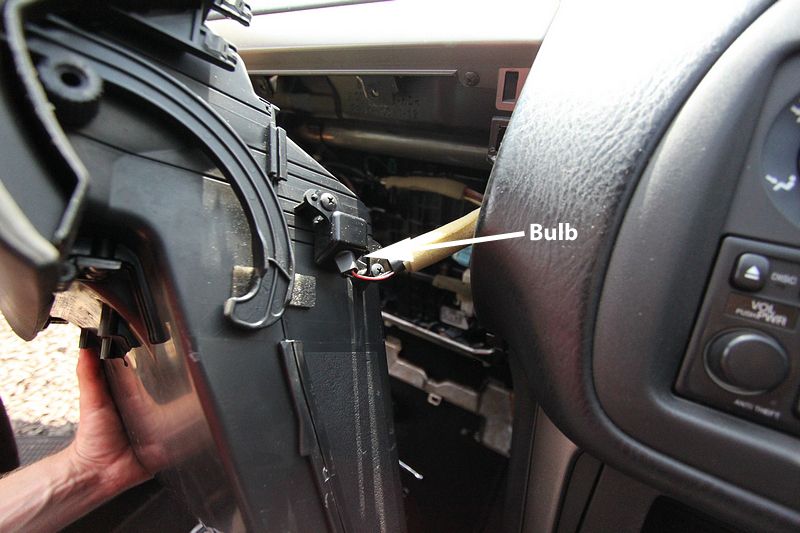
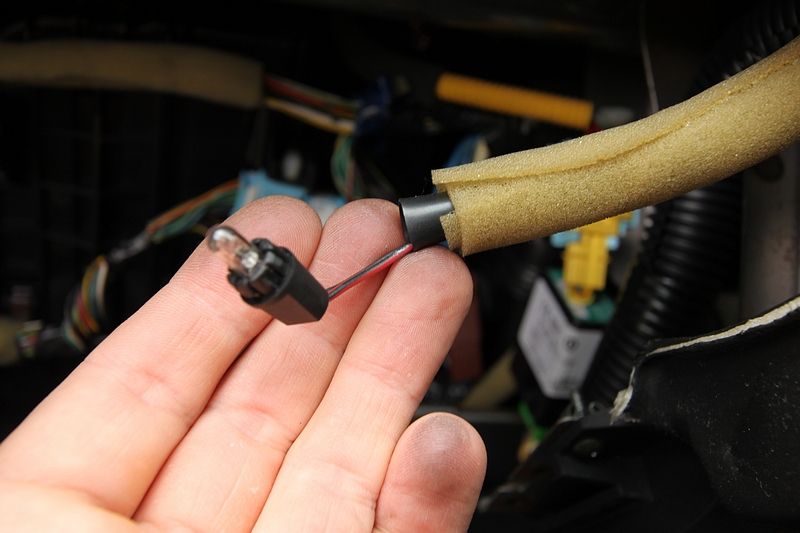
Look for the bulb, grab the base of itand just pull down and out.

9bulb_tn1_zps268010a2.jpg


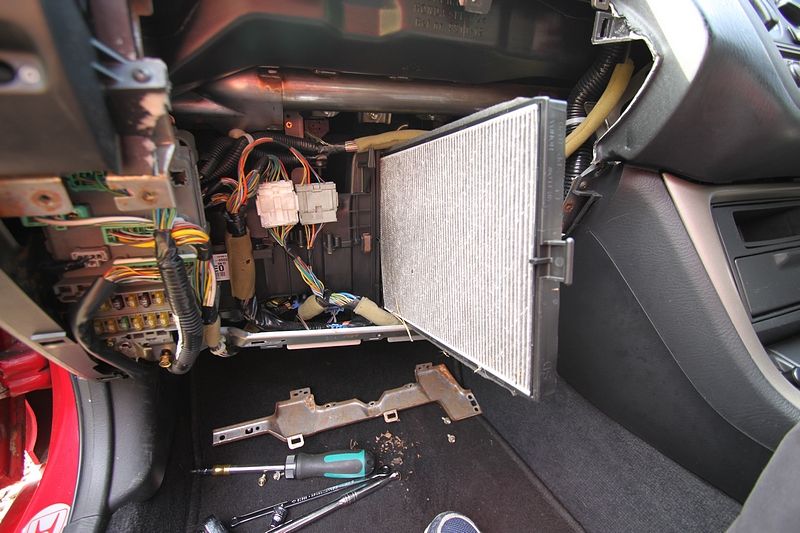
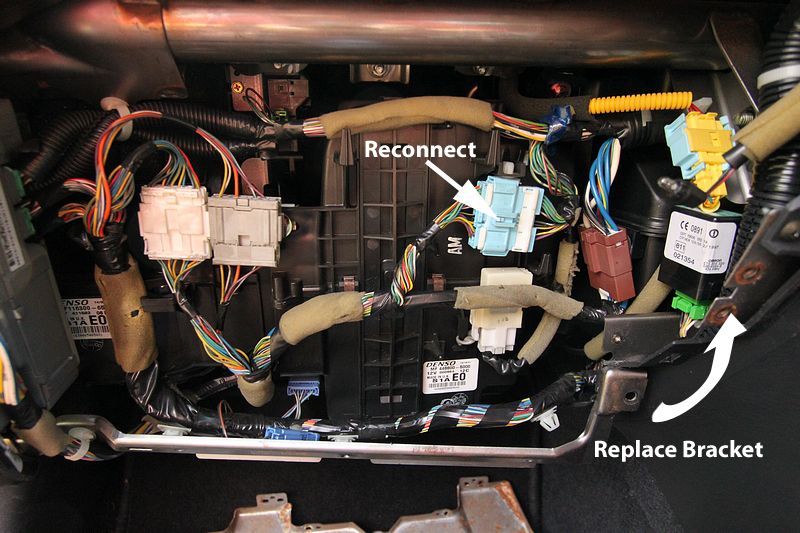
Squeeze the white lugs of the clips and push them back through the lower bracket.

13aUndoClips_tn1copy_zpsce23bc8f.jpg


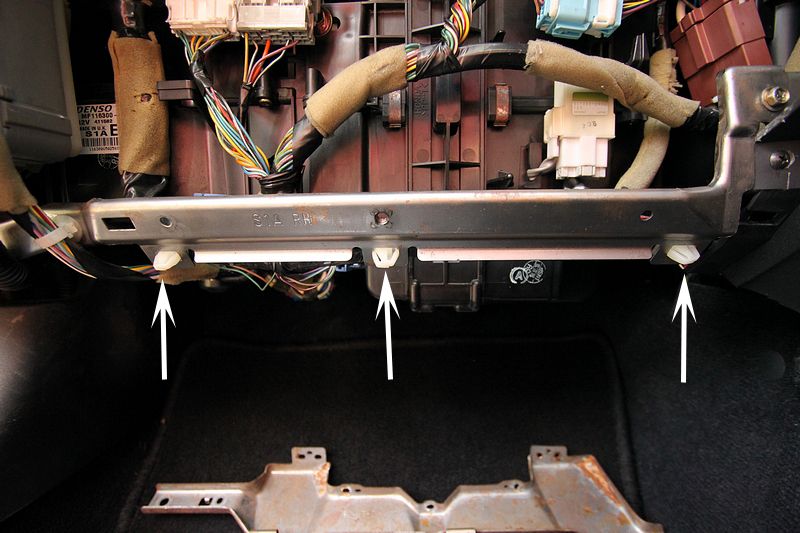
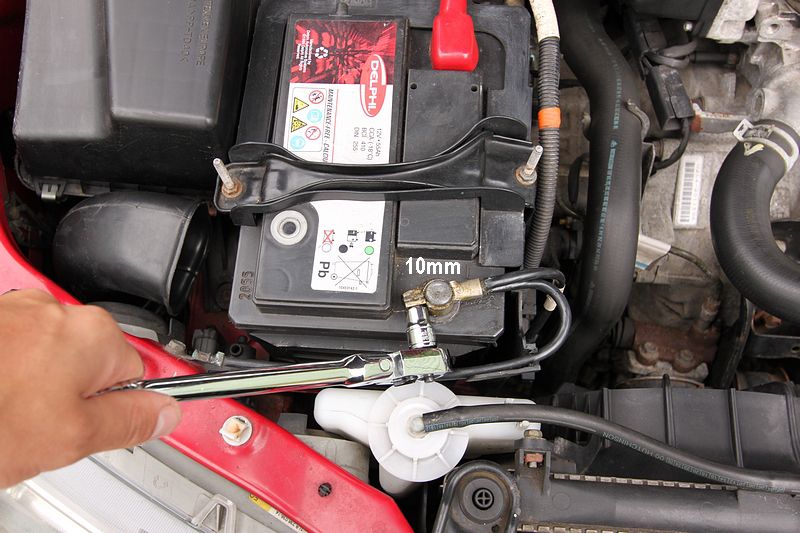
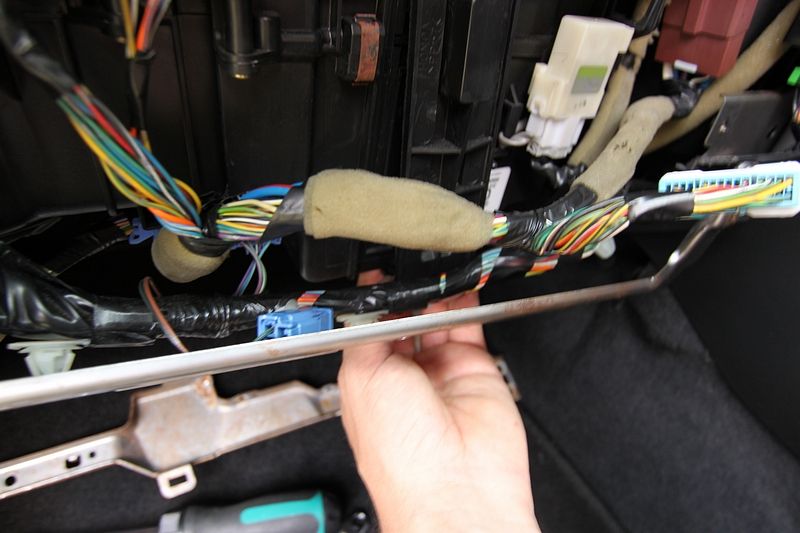
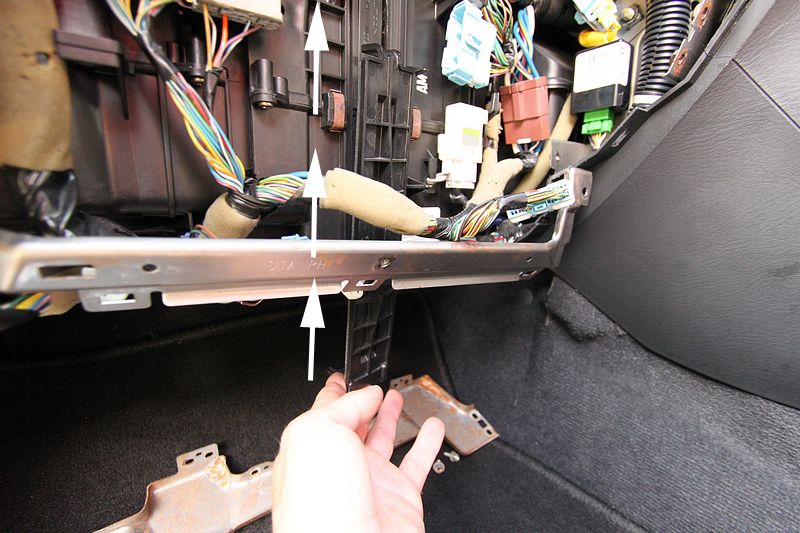
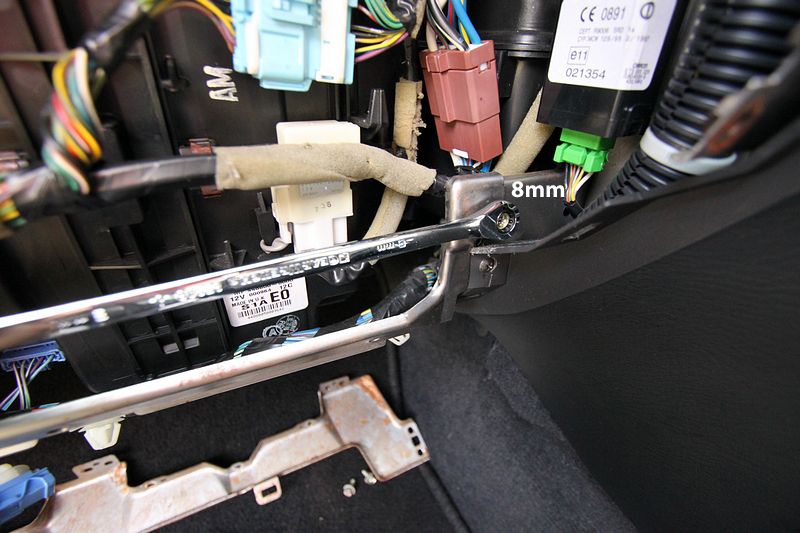
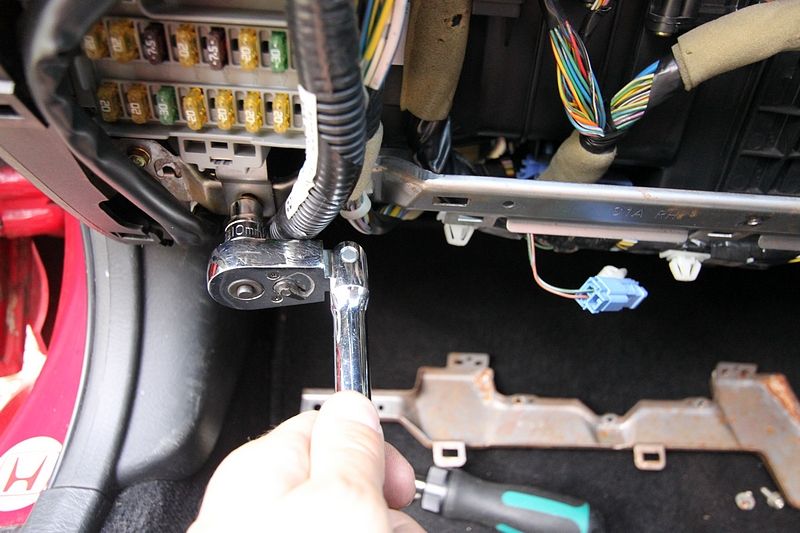
The lower bracket needs to be dropped,not fully removed. Undo the 8mm screw on the right with a spanner,no room for a screwdriver or socket. The 10mm just needs to be loosened enough. You need to then lift the right hand side up and over and then hopefully this bracket will pivot down to the right just enough for the job.

12lowerbracket_tn1copy_zps007e28c3.jpg
 
Lift the right of the lower bracket up and out then let it just hang there. Now disconnect the Blue Plug. This plug is the only one I'll be disconnecting.

14droplowerbracket_undoblueplugcopy_zps09d26913.jpg


Unclip the filter housing bracket from the larger clip underneath, then the top clip should be easier.

15UnclipHousingCover_zpsaa5fe3bd.jpg


The filter bracket orientation, larger clip at bottom.

16coverorienation_tn1_zps85937d85.jpg


The next shots have the filter partially removed, so its a bit out of sequence. Do NOT pull too hard on the wiring in the next steps. You need to lift the upper loom up and out the way, the bottom loom and lower bracket down and out the way then pull the filter through. I didn't have enough hands to do this and photos but its easily understood whilst doing it.

17toploom_tn1_zpsaf2d1a1a.jpg


Lower loom and lower bracket

18lowerloom_tn1_zps8929c4bc.jpg


Filter out

19slowlyremove_tn1_zps3725c867.jpg


Vacuum gently all the debris you can reach. Don't prod the tool around erratically inside.

20vacdebris_tn1_zps20734bc0.jpg


Reinstall the new filter, note the flow direction.

21insertfilter_tn1_zps14622363.jpg
 
Reinstallation

......is reverse of removal. No need to describe the steps...

22insertclip_tn1copy_zps54a66712.jpg


23reclipblueplug_positionlooms_tn1copy_zps853adfdd.jpg


24tighten8mm_tn1copy_zps532c723e.jpg


25tighen10mm_tn1_zps81466854.jpg


13aUndoClips_tn1copy_zpsce23bc8f.jpg


8watchforbulb_tn1copy_zps04ca1066.jpg


28clipgolveboxleft_tn1copy_zpsf5f7ddc8.jpg


29clipgloveboxright_tn1copy_zpsfc8e735d.jpg


30gloveboxinstalled_tn1_zps9332d4f2.jpg


3TopScrews_tn1_zps5a29bf01.jpg


4removebracketbolts_tn1copy_zpsa310db1e.jpg


5removescrews_tn1_zps37ee26ae.jpg


33ReclipPanel_zps46d7b275.jpg


Reconnect the Battery, turn on the ignition and start the engine and ensure any dash warnings clear. Reprogram your radio and Auto window.


You have completed your 6th Gen Pollen Filter replacement.
 
Wow! Another great write up man. Great work. Thanks.
 
Superb job Andy, well worth doing regularly, the condition of the old filter says it all, I wouldn't fancy that getting into my lungs.
 
I'm about to do mine Andy so thanks for the great How-To and all the others you've written :) .
 
Another awesome write up! Many thanks for this.

I have one question regarding the filter itself, you know the black housing the paper bit is inside, is that part of the whole filter or is that like the tray where it sits in. I bought my filter from eurocarparts which is made by crossland, and it only came with the paper bit, and doesnt have that black housing surround, I'm ***uming its meant to be like that and the paper bit slots into the housing secured by those grey foam on the edges?
 
The black plastic surround is part of the filter itself on the 6th Gen.

On the 7th Gen it's just paper...so I'm wondering if they sent the right filter.
 
Was wrong one, anyone planning on buying the filter from Eurocarparts or carparts4less dont bother, they always send the wrong parts, well for me anyway and their customer service is atrocious. Should of just stuck with Holdcroft or Cox since the OEM filter ain't much more and is guaranteed to fit and the customer service is 10x better!
 
Hey guys just to let you know I bought an OEM pollen filter from HH, although they do send the black surround thingy you do not need it! the actual paper parts comes out, so the paper filter I got from Eurocarparts would of just slotted into the surround that I should have already. This is ***uming that pollen filter I just bought hasn't been redesigned like this.
 
Really helpful instructions - thanks very much.The filter I used was a Blueprint ADH22501.
mikko
 
Brilliant guide, very well written and illustrated. The airflow in my car was so bad I couldn't de-mist the windscreen on a trip out in the wain today. I am currently filter-less and have a footwell full of trim until I get a new element, but at least I can de-mist the windscreen using the now gale-force wind.

Cheers!
 
Thanks for this am going to give it a go when I service the car. I know a lot of people are not fans of them but at Halford you can currently get a cabin, Oil and air filter for then then £10 delivered to store next day.
 
When I have changed cabin filters in the past. I have sprayed detol air freshener into the vents and run the blowers on recirculation for 10 mins. This should kill most germs in the system.
 
Top