What's new

Basic DIY servicing and maintenancefor noobs

Nice one Andy, really appreciate your fantastic write ups and the ones others have done, would be struggling without them!

Today was a fail day, and am raging at the moment, some bint being a typical women driver rather than waiting since her lane had no space decided she would omnivore on when there was no space and forced me to move to the left and ended up scuffing my wheels badly, so p****ed off, trying to revamp the car and instead the opposite is happening, on top of that some drunk bint must have slammed her handbag across the passenger door as there is large scratch mark on it! Wonder if its worth spending so much money on the car, the pitfalls of living in inner london. :rolleyes:

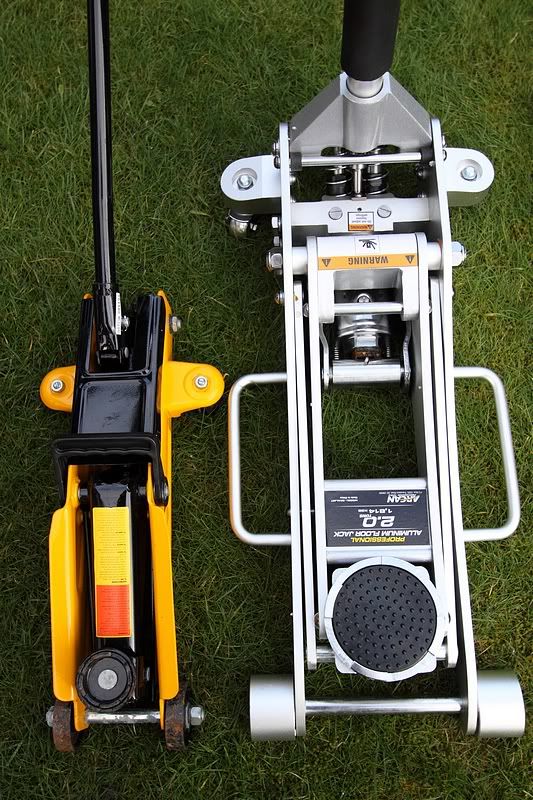
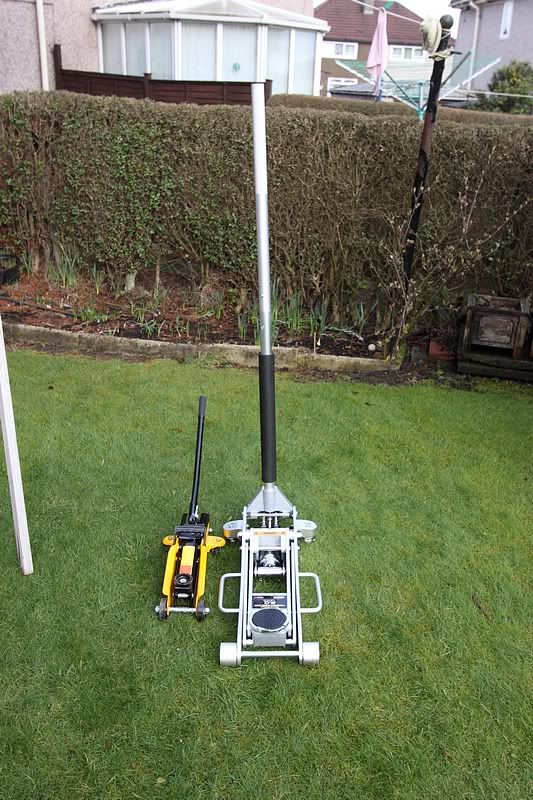
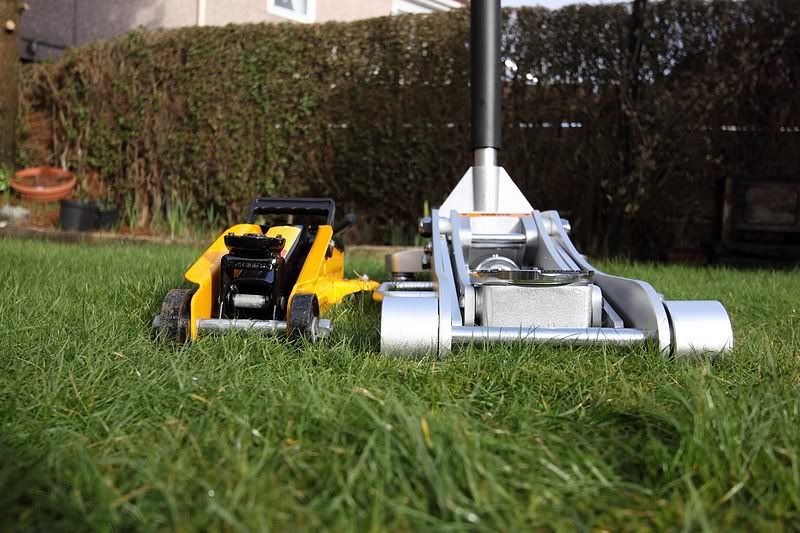
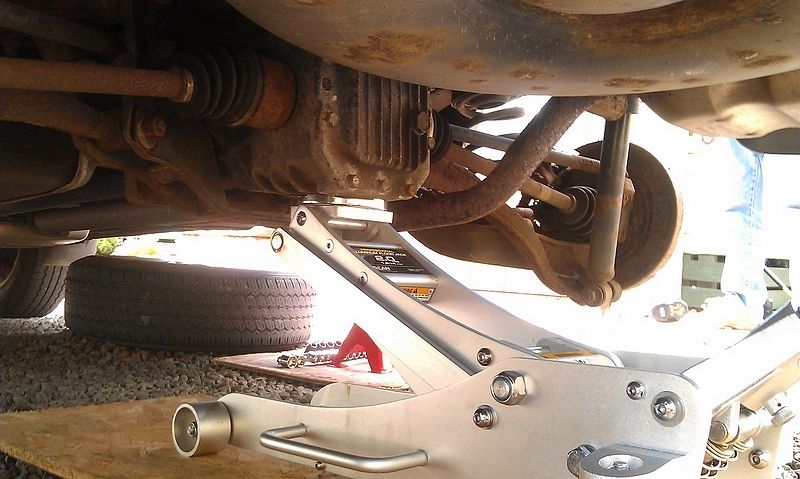
On top of that as expected the car jack my dad has is ****** rubbish, did not go high enough to put the axle stands in, so couldnt even do the oil change and filters, so now i'll have to buy one. :rolleyes:

So annoyed right now. :mad: :mad: :mad:
 
Two quick questions.

Anyone know what MM size of tubing I need for the brake bleed valve? and the size of the washer for the gearbox bleed bolt and filler bolt?

cheers
 
The Vizibleed tubes from Halfords fit.

The gearbox washers are very thick and sturdy compared to the oil drain plug washer. I've haven't changed them over several changes and never had a leak yet. If you just make sure they are torqued correctly when they go back on you should be okay. Take the filler off before the drain just in case you can't get it off.

Good luck.
 
Cheers man for the info, I'm going to just use a bottle and buy some tubing, so a trip to Halfords might be in the books to get that vizibleed tube measured up :ph34r:

I've asked the HH guys for a price on the washers, if its cheap I'll buy some, if not then I'll just reuse them as per your suggestion, good idea with taking the filler off first thanks for the tip.
 
I've got that tube aswell, it cost about a fiver and that has a oneway valve on the end so restricts fluid and air going back up the tube to a degree. Its probably worth buying it for a fiver, rather than hunting around and buying tubing etc, your call of course ;-)

Get a turkey baster and draw most of your old fluid out the reservoir and stick that fluid into a bottle or jar, then submerge your valve end into that fluid.


Does anyone know the diameter of the gearbox filler hole? I have a flexi-funnel to fill it but might have to put some tubing on the end if it is too wide.
 
I probably might just end up buying one, as I would like to change the brakes on Saturday if the weather is what is predicted and probably won't get the tubing by then if I order it, the halfords one seems cheaper than the draper one I was looking at originally too. I've got a turkey baster too, thanks for the tip with the fluid.

The filler hole I can only ***ume its 14mm as the member who did a how to on replacing the fluid had a picture of a 14mm plug. I bought a 10mm 1 metre long fish pond tubing to fill it up with, I hope it ain't too small but the next size up was 13mm which might end up being too big. One mistake I made is buying braided tubes, as it isn't as flexible and rather bendy, but should do the job hopefully.
 
The filler hole I can only ***ume its 14mm as the member who did a how to on replacing the fluid had a picture of a 14mm plug. I bought a 10mm 1 metre long fish pond tubing to fill it up with, I hope it ain't too small but the next size up was 13mm which might end up being too big. One mistake I made is buying braided tubes, as it isn't as flexible and rather bendy, but should do the job hopefully.


Sealey metal oil syringe does the job.

Cheers guys ;)
 
Cheers for the heads up Cliff.

Today I tried again with the oil filter and oil change and I am embarrassed to say this but I failed and gave up :blush: :( :( :(

The trolley jack I bought from MachineMart with a stated 380mm max life height failed to go beyond the minimum of the axle stands around 270mm, so it left very little room to go underneath but since am not a very big guy I managed to squeeze in but there was very little room for leverage or to manouvere, the sump bolt refused to come off, it is so tight, I just couldnt get any good shape to give a proper try, smacked it a few times but just scarred the bolt and the car was moving on the stands, then the Oil filter its in such an awkward place, why on did they place it so far up and in a blocked space, couldn't get to it as I couldnt move my arm properly in the very little space I had, gave up in the end and will get those two done by one of my dads contacts, really gutted as I don't like failing or giving up, probably could of fone it with a better jack but dont see the point in spending more on one to then run into problems. Will give the fuel filter a go though since it's in a less awkward place then the oil filter.

One thing though I noticed the whole area around the sump and under the engine in the passenger side was full of oil :eek: should I be worried? Oil level seemed normal, but I'm wondering if it might be the gearbox oil, whereabouts is plus for that located? I may well have a oil leak somewhere.
 
The sump is at the passenger side, you might have a sump gasket leaking/seeping between it and the block, apparently that was common on early CR-Vs using the B20 engine. So not a definite, but maybe somewhere to look.

The jack I have has a 495mm lift, its gone up about £30 since I bought it unfortunately.

Here it is compared to a Halfords 2tonner
TopView.jpg


SideBySide.jpg


MinimumSaddle.jpg


I use plywood under the jack to protect the wheels and also the tarmac or if I am working on gravel. Also because of that low saddle height having wood underneath give you maybe upto 10mm of extra gain. Its length lets it roll in with ease, its width keeps it sturdy, the diameter of the saddle helps spread the load and length of the handle lets you control it from a bit further.

Here it is under a Santa Fe which has quite big boot so using all its benefits here for placement and lifting.
IMAG0437_tn1_zpsf1dc8ff9.jpg


Did you try any penetrating oil on the sump bolt? Remember if you can double the length of your breaker bar, maybe with a pipe over the top you double its effective force. I sometimes use my big jack handle as a cheater-pipe over my breaker bar.


Here is a 6th Gen gearbox fluid service, will be easier to take off the front driver wheel (offside front) and look in. Follow the driveshaft back to the gearbox, the drain hole is on the bottom and the filler is up and to the left

http://typeaccord.co.uk/forum/topic/13530-6th-gen-mtf-manual-transmission-fluid-full-change/
 
That's a bling jack man. I like it.
 
A large jack makes life a lot easier.

£150 might seem a lot of cash but if you are doing an annual oil service, then maybe a brake service (tidy up and clean) say over a ten year period then its £15 per year, then split that cost between jobs so £7.50 just doing brakes and one oil change. You will likely undertake more jobs cause its easier to lift as well, less effort.

Now if you offset the savings of doing diy and using HH discounts against garage labour charges over the ten year period you'll have a decent toolkit and valuable experience.

Well thats how I justify my tool junkie-ness :lol:
 
^ lol it will be worth it in the long run. I like your trolley jack I think i've seen it at costco, its a bit of a beast! if I find myself doing more jobs in the future I may need to invest in one! But at the moment finances are tight and space is a premium as well, am having to keep all the tools in the boot at the moment :(

Thanks for your advice again. Not one to quit so easily I gave it another shot on Sunday, this time a proper try unlike the feeble attempts before and managed to do the oil and filter change! :D Was a really simple job in the end. I didn't use penetrating oil, but managed to get the sump plug off by giving the ratchet a good whack which loosened it. Manage to get a whole lot of oil onto my arms as I didn't position it out of the way :blush: fortunately it wasn't too hot, but any other noobs trying this be aware and make sure your arm ain't in the way of the oil flow. Tourqed the plug back to 44nm too which seemed alot, I hope its not another fight next time I change the oil!

The oil filter was annoying also in the place it is as the oil from it drips onto the exhaust, thought about placing a rag above it but wasn't sure if it was a good idea, so just let it drip out. Gonna leave the oil leak if it is that for now, when I cleaned it, the oil seemed quite old so could of been some spilled it whilst filling it up. Also another thing is when jacking the front of the car up make sure to take the handbrake off cos the car moves back then put it back on, also place the axle stands at the back of the jack points cos then they properly onto it when you jack the car down, otherwise they will move away.

All in all the oil and filter change didn't seem to make a massive difference to the drive but hopefully underneath it will be doing its job. Next job if fuel filter, then the brakes the gearbox fluid change. Also noticed a bit where the paint chipped off on the roof sill has started rusting :( so thats gonna be annoying to fix and another job to add to the list.
 
Tried the fuel filter today and as usualy ran into one or two problems. Started raining, managed to find a railway arch on a closed off road, went it came to jacking the car up the rear would not go up high enough to stick the axle stands under :rolleyes: should really get this jack changed and get the 3 tonne one.

Is there any other place I can jack the car up with? Preferably near the rear passenger jack point so I can slide the axle stand in and then work on the car. Maybe somewhere on the sub frame? theres lots of solid looking metal frame underneath, but not sure if its safe to jack it on any of it, one bit I was gonna try ended up looking like a wishbone so didn't in fear of damaging it.

Car passed the MOT aswell :D Mechanic mentioned the rear discs need changing, so thats back on the list of to do again :rolleyes: also said the sump gasket might be leaking as you mentioned Andy, gonna leave it though as its not a big fast leak.
 
Hi, Have you thought of putting the jack on some sheets of wood first to get a bit of extra height?
 
^ I think Andy mentioned it earlier on, did think about it but then i'll have to buy or find some wood and then storing it will be a problem unfortunately, I'm thinking of returning the jack for a 3 tonner, cos there is no reason why a 2 tonne should not be able to lift that car up, I mean the rear end is pretty much very light!
 
Another fail today, attempted the Fuel Filter change again, jacked the car up on the control arm and got them on the axle stands. The bolts were a ****** to open took ages! and the filter sort of got stuck on it probably due to being on there for long time.

Anyway when it came to taking the filter off, started with the tank side as per the How To guide, but the ****** wouldn't come off! Squeezed the clips and tried everything for a good half hour, but it wouldn't come off even with force, don't really understand why, really frustrating made worse by the lack of space to work on, really horrible working under the car with small space, gave up in the end as it was getting dark, not sure if the filter is on properly, seems to be half way, but wasn't leaking so should be fine.

Tempted to just get this done at the garage, I think the MOT place will do it for a tenner, might just do that as I'm running out of time, and don't want to risk breaking such a volatile part. But I hate giving up, this would of been the easiest job of the lot had it come off easily, but the ****** had other ideas. :rolleyes:
 
Ahh sorry to hear this...I can't really remember how hard I was pressing those clips but I know it was a bit of a fight (the first time was the howto for me too, and there weren't any existing on any of the other forums). You do need to squeeze a bit, it was probably a two handed job squeeze and release (awaits Simon comment haha)

You might get some joy from tackling it from the front (awaits Simon comment ;-) ) but I decided I'd rather fight the hose end first rather than the pipe end :wub: . Actually saying this out loud makes me think the pipe end would make more sense doh! The hose has some flex whereas the pipe could be crushed, but I think I was worrying more about saving that resuable retainer.

Maybe try the front/pipe end next time bud. You can see the new filter insitu and the clip on the pipe-end looks easier to release in my very own photo lol. Let me know, I have no problems about re-writing the howtos if you find better/easier ways ;)
 
No need to apologise man, not your fault, your write up is great and spot on, just the clips were a buger wouldn't come off for whatever reason, squeezed them so much I got small blisters :blush: they don't seem to retract fully or getting stuck on something the bit where it goes over, hard to describe, tried from all positions, the best thing probably would of been to take the wheel off as I would of had a lot of space to work then, if I had another retainer I would of just broken the existing one off. The one coming from the engine side seemed fine as in the retainer and clip depressed properly and had a nice feel, I didn't bother taking it off though cos it looked like the fuel tank side wasn't going to come off.

Really annoying would give this another go but there is too much to go wrong IMO, the place where I work on the car is around 2 miles from home and on a visitor parking space :lol: so don't want to break anything and be left stranded. Who knows though might change my mind and give it another go, if not will speak to the MOT place, they are nice people and might ***ist me and maybe let me use there lift for a few pennies. :unsure:

Will report back how I get on and post any tips I can pick up on getting the fussy retainer off.
 
Well the weather looks to be wet this weekend so ended up booking a slot at the MOT place to get the filter off, will be gutted if it comes straight off without any fuss. :lol: S But should only cost me a tenner or so.

In the meantime will be doing the fog lights up and put some yellow tints on them. I have also received a nice little original skank2 gear knob, which I must say is lovely. Also ordered some gunmetal grey brushed vinyl to put over the horrible fake wood trimmings on the car and currently looking into some led bulbs for the interior lights.

Hopefully if the weather holds up next weekend will give the brakes a bash. Still waiting to have some parts ordered from Holdcroft as they hardly respond when you email them, so will probably need to phone them which is annoying.

Will post some pics up of any mods I do.
 
So ordered the following parts from HH.

1) Rear Brake Discs
2) Pollen Filter
3) 2 litres of MTF with drain and filler plug washers included in price
4) Spare retainer clip for fuel filter towards tank side (just in case the existing once is fubared)
5) 5 litres of coolant and the washer for drain plug.

Hopefully the weather will hold up this weekend and I'll get a few jobs out of the way. Fuel filter is booked in for tomorrow, not happy having to resort to a garage, but needs dictate...

Also got a few goodies, as I will be giving the interior a fresh up, i'll be making a few changes, the vinyl trim to retrim the fake wood has arrived and it should go nicely with the skunk2 knob, bought some leds bulbs and will need to try them out, also still need to fit the new fog light and cover them in yellow tints.

The lack of progress made is rather disheartening, can't beelive i've only done around 3 jobs since the start of the thread and I've got up to 40 jobs to do, a lot will have to wait till next year as the coming weathers and shorter days will not be kind. :(
 
Another day and another time wasted, but perhaps its destiny. A good reminder why I actually decided to learn this stuff and the jobs myself. The garage yet again after booking me in says they are busy, and asks me to come in later, as if I don't have work to go to and other stuff to do. Anyway told him to shove it, since I've bought a new retainer clip I might as well give it another go and get that satisfying feeling that I did it myself and not via some time wasting grease monkey, so worse comes to worse if I break the clip I can replace it!

I have a feeling last time I didn't perhaps depressure the fuel system properly, I only cranked the engine twice when I took the fuel pump fuse out, so perhaps thats why it may have been difficult to take off the filter.
 
Ah bad news with the garage. Basically one of the reasons I started myself was the hassle of getting to a garage, then the waiting around, then was the job done properly after all that. Paying for labour and parts/profit not the mention the higher cost, the more VAT ontop aswell. Better off investing in some tools and materials IMO.

Right lets get this Fuel Filter done....lets have a closer, dug out another image of that clip.

You might need to squeeze the inner lugs (the right hand side arrows) aswell as the outer edge (left arrows) and sort of rock it out if that makes sense. The hose will be gripping it at the black pointer.

IMAG0090copy_zpsf17c7d77.jpg


It could be possible once you have got some movement in the inner lugs (bottom in this pic), the outer edge can be depressed to help ease out the retainer.

r11Newfiltercopy_zps826c4c5e.jpg
 
From what I remember of this job when I had a 6th Gen, looking at the pic with the blue background, the right hand arrows point to two triangular pieces of plastic.

The arrows point at the thick end of the triangular pieces, but you are interested in the other end, the thin ends which fit under the retaining ring on the grey tube.

Lift those thin ends up with a precision screwdriver one at a time. You'll need to hold the tension after the first one while you do the second. Then it will slide off.
 
When the pipe comes off a cupful or so of fuel comes out so it's best to have a baking tray or similar on your chest to catch it otherwise it will soak into your clothes and they will stink!
 
To get the pipe off the white clip you squeeze the white bits you can see...I can't remember if you can get a screwdriver onto the triangular bits and push down as well while the pipe is still on or not...where the lower arrows are in the second pic.

Good luck!
 
Were you able to keep the retainer inside the hose?

When I got the filter off, the retainer stayed on it. Then using your technique almost exactly, replaced it on the new filter. (the lip pointer is a bit too far right in this pic, should be pointing to the grey ring/lip)

tn1_10RemovingRetainer.jpg
 
No the white retainer would always stay on the filter, then I just took it off and re-used it on the new filter.
 
Top