You are using an out of date browser. It may not display this or other websites correctly.
You should upgrade or use an alternative browser.
You should upgrade or use an alternative browser.
Basic DIY servicing and maintenancefor noobs
- Thread starter exec
- Start date
Agreed Andy, one reason why I also wanted to learn and do these stuff myself.
Thanks again for your help and putting those images up and thank you Clifford for your help and info. The connection between the fuel filter and the fuel pipe on mine looks really different, I wish I took a picture as I can't remember it properly, but basically the pipe is connected halfway into the fuel filter pipe. I don't think the pipe is even inside the retainer, it is kind of half way and looks to be stuck, man can't even remember properly :unsure: , but the pin squeeze is kinda stuck and doesn't budge and wedged into those pimples that it goes over, I think the clip on mine might even be the other way around, getting confused here sorry.
Ahhh I just remembered maybe I'm doing one thing wrong here then, I tried to pull the white retainer off along with the fuel pipe! Maybe that's where I've gone wrong, as it appears from what you both wrote the retainer doesn't come off the filter, well not by how I was doing anyway, so maybe I should just squeeze those two clips at the top and pull on the fuel pipe which will come off, leaving the retainer in place. I'll be gutted and relieved if it is something as simple as that!
I've got another clip coming in on Monday so that should be plan B, will report back how I get on, might take some pictures if possible.
New filter
Old filter

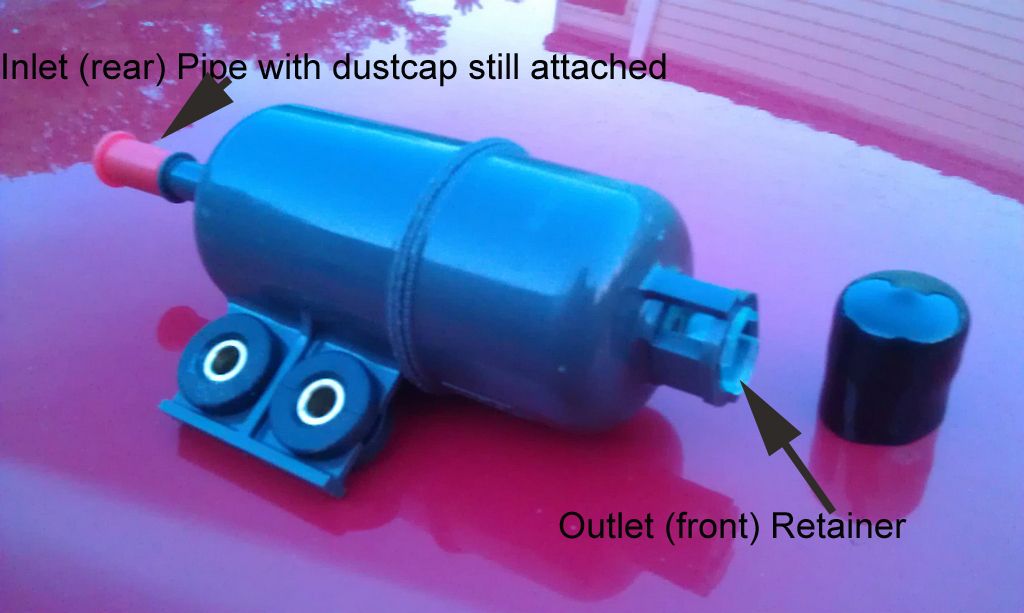
Yeah the end, let call it the inlet should slip inside a fuel hose. This is the end that the retainer should remaining on the filter, leaving the hose empty.
The front or outlet as I described it, retainer was not on the old filter when removed it stayed on the fuel pipe going forward to the engine.
Lets look at this another way, the filter has a male and female end and corresponding connections in the fuel line. In my experience, the retainer is retained on the male end in both instances. The retainer then needs to be eased over a lip in the pipe, a small screwdriver makes this part a lot easier.
Old filter
Yeah the end, let call it the inlet should slip inside a fuel hose. This is the end that the retainer should remaining on the filter, leaving the hose empty.
The front or outlet as I described it, retainer was not on the old filter when removed it stayed on the fuel pipe going forward to the engine.
Lets look at this another way, the filter has a male and female end and corresponding connections in the fuel line. In my experience, the retainer is retained on the male end in both instances. The retainer then needs to be eased over a lip in the pipe, a small screwdriver makes this part a lot easier.
SayamaAccord
And still...
maybe I should just squeeze those two clips at the top and pull on the fuel pipe which will come off, leaving the retainer in place.
Yup, simple as that.
I'll be gutted and relieved if it is something as simple as that!
Nah, you'll be delighted when you finally get the ****** off!!
Hey guys thanks again for the heads up and info, so when refitting how do I fit the retainer back on? Do I need to put it iver the fuel hose and then push the fuel hose into the inlet and then push the retainer back so it goes over the locks?
Also my parts arrived from HH, the retainer clip I thought I ordered is not what it appears, I have no idea what it even is! Will post a pic up soon. Kinda annoying if it is the wrong part.
Got a new key fob cover aswell, was going to repaint mine but found some copy replacements on the bay for £4.
Also my parts arrived from HH, the retainer clip I thought I ordered is not what it appears, I have no idea what it even is! Will post a pic up soon. Kinda annoying if it is the wrong part.
Got a new key fob cover aswell, was going to repaint mine but found some copy replacements on the bay for £4.
SayamaAccord
And still...
Just use the old retainer, slide it onto the new filter, then clip the fuel hose on.
SayamaAccord
And still...
I re-used mine 3 or 4 times without any issues.
Cheers man, I do plan on reusing it just bought another one or thought I did as a back up in case I break it, have to break it or already have broken it.
Here's what they sent me. Doing a google of the part number it seems like some sort of generic part used on multiple Honda's from the 90's, the fuel filter on the 6g seems really different from the rest.
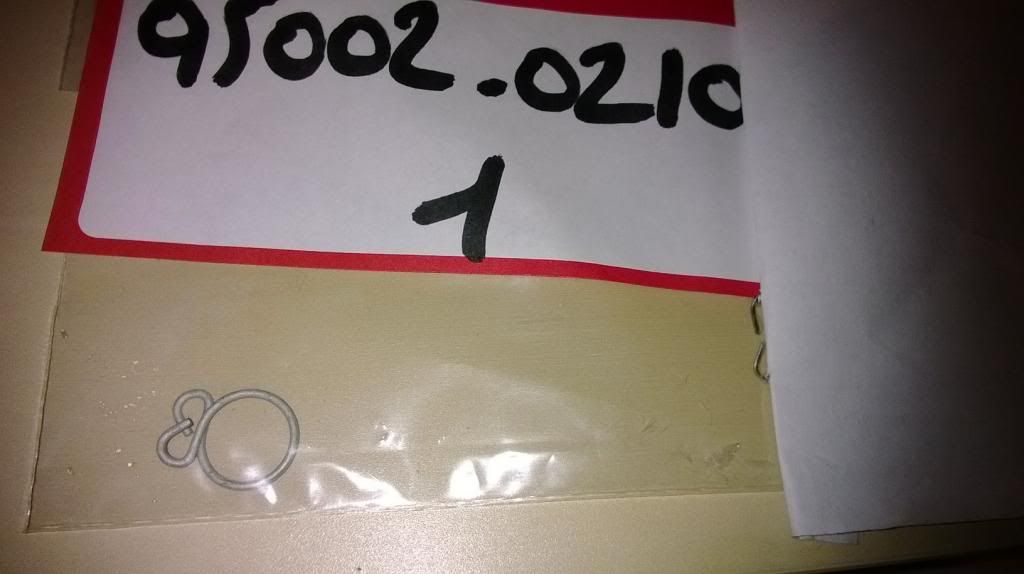
Here's what they sent me. Doing a google of the part number it seems like some sort of generic part used on multiple Honda's from the 90's, the fuel filter on the 6g seems really different from the rest.
Also while am it, here is what I will be using to fill the gearbox fluid as its in an awkward place.
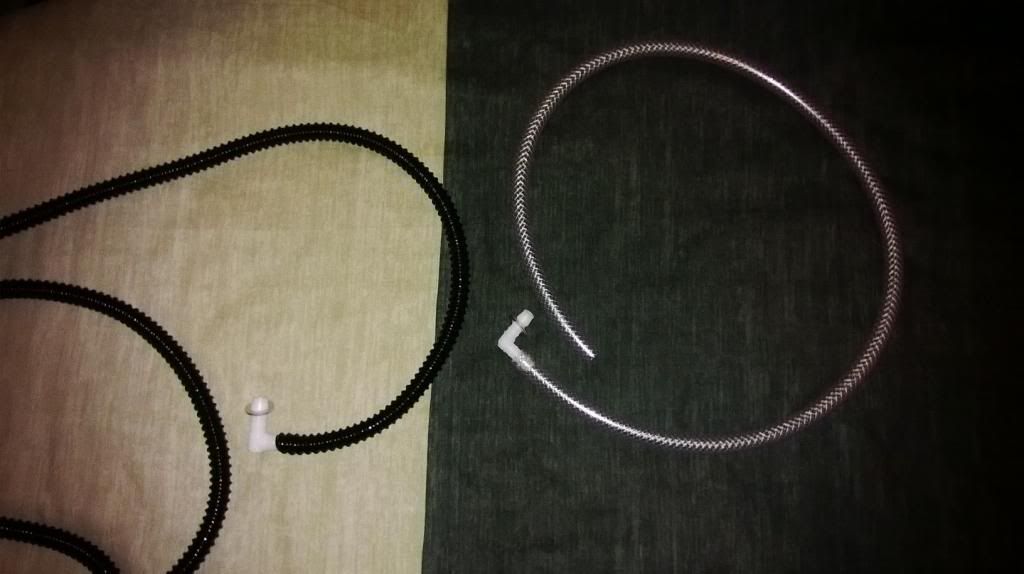
The black one is a 12mm CORRUGATED FLEXIBLE HOSE FISH GARDEN POND FILTER PUMP MARINE FLEXI PIPE 2 metres long, which is too long and will need to be cut abit, then the white 90 degree part that will slot into the filler hole is a BARBED PLASTIC CONNECTORS AIR FUEL HOSE PIPE FITTINGS JOINER
http://www.ebay.co.uk/itm/171142284167?var=470294677001&ssPageName=STRK:MEWNX:IT&_trksid=p3984.m1497.l2649
http://www.ebay.co.uk/itm/290649269451?var=590048374813&ssPageName=STRK:MEWNX:IT&_trksid=p3984.m1497.l2649
The other transparent one is mesh reinforced fish pond pipe, which is way to thick and doesn't straighten, would avoid this, its also 10mm so a bit thin, the 12mm pipe will fit nice and snugly in the 13mm filler hole.
Today I managed to get one job done and haven't made progress on other stuff in last 2 weeks as I had a lot of stuff going on. Pollen filter is now change, and boy was the old one filthy, there was so much dirt left in the pollen filter area aswell, leaves and other muck, was a PITA to clean. Ended up using a garden plant stick to get the dirt from the back, then a car hoover to suck it all up and then I finished off using some dash wipes to clean off smaller debris and dust. Very clean now, should of taken pictures of the "after" since I took some of the before, but forgot as I rushed to put everything back before daylight went away! Even forgot to try out the air con! 
Just occurred to me the other day on my fuel line the black plastic is missing, and the fuel line pipe just connects straight to the fuel filter, which is why I couldn't get it off with all the tugging, if it had the proper connector then it just clips off, so this is going to be a ball ache by the looks of it.

In two minds whether to buy the black clip thing, I already ordered the white retainer clips had I remembered about the black plastic bit could of ordered one!
In two minds whether to buy the black clip thing, I already ordered the white retainer clips had I remembered about the black plastic bit could of ordered one!
Hmm you know what Andy, am so confused that now I think it does have the black clip thingy, I guess there is only one way to confirm though and hopefully I will try it out tomorrow since it should be sunny.
I did actually order some retainer clips and those black clips from the states, no idea if they are the same type but if the white retainer clips are the same I will hang onto these as they might come in handy in the future, the black ones I can sell off. I also ordered this special yellow funnel coolant kit thing that looks interesting and those valve adjustment tools you posted, am thinking of investing in the gunson autoclik too if its any good.
I did actually order some retainer clips and those black clips from the states, no idea if they are the same type but if the white retainer clips are the same I will hang onto these as they might come in handy in the future, the black ones I can sell off. I also ordered this special yellow funnel coolant kit thing that looks interesting and those valve adjustment tools you posted, am thinking of investing in the gunson autoclik too if its any good.
Gearbox oil change done. Am a bit worried whether its fully filled, as a lot dripped out after filling it up with the full 2 litres of the bottle! Ran out of time to do fuel filter as night fell. really easy and simple job though.
One worrying observation is whole of the underneath from the engine to gearbox is full of oil, so there is defo some leak somewhere!
One worrying observation is whole of the underneath from the engine to gearbox is full of oil, so there is defo some leak somewhere!
SayamaAccord
And still...
.One worrying observation is whole of the underneath from the engine to gearbox is full of oil, so there is defo some leak somewhere!
Good job.
My 6th gen gearbox was like that, but it looked worse than it was - as long as you're not getting gear oil on the ground under the car it should be okay as long as you check the level every year.
Thanks man it is most likely the sump gasket leaking I think as its prominently in that area.
I also received some after market clip retainers for the fuel filter from America. The ones needed are 3/8th Dorman 800-086 or get the pack 800-016. I will post some pictures up of it. I should have some spare if anyone ever needs one desperately.
I also received some after market clip retainers for the fuel filter from America. The ones needed are 3/8th Dorman 800-086 or get the pack 800-016. I will post some pictures up of it. I should have some spare if anyone ever needs one desperately.
Fuel filter is finally done! Was an easy job but a bit of a peach getting the filters of the lines, my fingers are a bit sore from holding those clips for so long. Had to push and pull a lot and fair bit of tugging, quite frustrating especially with the addition of rust particles going in my eyes! Goggles are highly recommended!
When the fuel tank side was detached petrol streamed out from the filter, was not prepared for so much to come out, it went everywhere and became a bit messy, used the red dust cap from the new filter to stop it gushing out further. But the fuel pump fuse trick worked well as there wasn't much coming from the pipes. The engine side on the other hand was a lot trickier and took a while to get off. I'm glad I didn't take the battery cables off as I had petrol all over me, although it is recommended to take the neg cable off, perhaps its advisable to have a second person to help out with these stuff. Used a lot of tissue and gloves, so make sure you have plenty of those.
Car seems more fluent after the gearbox oil change and now the fuel filter change, topped up with some fresh petrol and it seemed more responsive, placebo effect? who knows.
Next up the brake discs and pads. I'm dreading doing this job. :blush:
Few other jobs done today; Fog lights tinted yellow and replaced broken one, fitted Philips Xtreme bulbs, throttle body cleaned although it was clean already!
On a negative note, some **** has scuffed my rear bumper, my rear bumper is pretty much ******ed now and looks horrible with all the scuffs that inconsiderate scumbags keep leaving it with. Will need to get it fixed at some point.
Also I opned the brake pads that I bought from Holdcroft Honda. They come with new brackets and caliper screws, so that will be pretty useful, just need to buy some ceratec grease.
no the 2 screws who holds the caliper back after you put the pads...not the screws that slide the caliper, this ones needs silicon grease..
eric the car guy has on youtube a video with brake disc change/replacement and you will see that his right in what is doing!
eric the car guy has on youtube a video with brake disc change/replacement and you will see that his right in what is doing!
^ thanks man well today was a bit of a fail day and waste of my holiday!
I did manage to get the front brake pads changed but there was two massive fails. First one was I didn't which direction to take off the caliper bolt, so got the breaker bar out and IIRC I managed to get it going anti clockwise thinking it was removal direction, so it started becoming loose so I thought yippee finally its coming off! But it wasn't coming off although it was loose now, so after changing the pads and putting everything back I went to tighten the bolt but it kept going round and wouldn't tighten, so I thought I must have put too much anti seize on it, also to note I had forgotten to bring the torque wrench with me! So anyway I take the bolt out to have a look and I have cross threaded it as the tread came off with it! eek! Total fail, so now I will have to buy some caliper slider pins, I've just left it as it is.
Secondly the old brake pads are practically new! about 1/4th used, so I wasted money buying new front pads and wasted a perfectly good pair of pads, a service of the pads would of done as they were a bit grimey and one section was very tight and some of the grease was gone on the pins. Lesson is folks always check your pads first! Other than that it was pretty easy, putting the grease was a PITA with all the mess, but what ruined the day was that it has made zero difference to braking ability, if anything it feels a little loose now, especially the pedal, am thinking there might be air inside as I left the fluid reservoir cap off, so that will need bleeding.
Next up is the rear discs and pads, hopefully lessons will be learnt from the front pads, slightly annoyed but you live and learn and cross threading the bolt has taught me a lesson, I shall be more careful next time!
It does get a bit confusing when looking at a bolt from the wrong side, ie with the stud pointing at you. Whether that be pointing at you in the caliper example or pointing upwards say in a ARB Bush bracket. In these situations the tool needs to turn in the reverse direction as you look at it.....obviously its still going counter-clockwise to undo, its just you are viewing it from the otherside so as you sit at the caliper and attach onto the bolt - you turn the tool clockwise (emphasising as you look at it and stud pointing at you).
Another way is to set your ratchet with the switch to off or counterclockwise, pop that onto any bolt and see what way the tool needs to turn to remove, then you can get in with a spanner or breaker bar full whack without any doubts on stripping it ***uming its not seized solid.
Remember to pump the pedal a good few times to set the pads before driving off, let the hydraulics take up any slack. You said you stripped the slider/caliper bolt thread and are experiencing a looseness at the pedal. You might want to look at that caliper and make sure it not slipped off, I'm a bit concerned about that one!
I doubt there will be air in the system just leaving the cap off. Air can't 'sink' past the highest point of fluid in the system. Even when pressure bleeding, the hose to the reservoir still contains air inside it until its purged back to the tank, so even air at 10-20PSI can't be forced into the system. Its related to the relative densities of the fluid and the air, maybe some TA engineering guru can better explain fluid dynamics to us lol.
I just keep a smallish paint brush aside to apply grease to the relevant places, keeps your hands clear and you can't go contaminating braking surfaces.
If its any consolation, the first time I done my pads I had more then enough life left in them yet still put the new ones in. Now it I just do a 'brake service' each Autumn - a few months before MOT time so I know the brake situation, everything off including disc, clean and grease up. It lets you know what condition your pads are in and maybe forewarns you of any excessive wear or hose/coupling rot. Get the top caliper bolt in by hand a few turns then I use a small prybar to ease up the lower bolt hole, again turned in a few threads by hand before torquing them down. Fronts are only on at 20ft-lb and rears are 26ft-lb so doesn't feel very tight at all but those are the official torque specs.
^ I read your guide like a million times where you mentioned the direction, but come the time to do the job I just forgot and got confused! Silly mistake. :blush: Thanks for that tip, will come in handy, hopefully I have learnt my lesson.
I did pump the brakes a lot, but it feels very light, I have to depress it a lot to get any braking action, they are not very sharp or have an instant response feel, much like they wer ebefore the change except they have a more softer feel. I think the caliper should still be connected, as the screw did go in but it doesnt tighten, I think I stripped off around half the thread as it came off on the bolt when I took it out, so it must be hanging on very loose, I'm now worried that I may have stripped the other 3 as I tightened them really hard with a breaker bar. Got a quote from Holdcroft and its a whopping £55 for 4 pieces of metal!
I'm wondering if these will fit: http://www.ebay.co.uk/itm/231046342302?ssPageName=STRK:MEWAX:IT&_trksid=p3984.m1423.l2649#shpCntId
Just worried about the quality of them and whether they will be a good fit, but they are a lot cheaper.
Good to hear about the brake fluid, can rule that one out, and handy tip with the brush, wish I thought of it earlier, I used like 2-3 separate gloves for the different greases!
Still gutted I wasted £40 on brakes that I didnt need and feels a massive waste chucking the old ones away, they are literally new! Now I will have to fork out for some pins, so could potentially cost me £90 in total, frustrating, but I will do what you do next time and inspect them yearly as it sounds like a good measure, but at least I am now familiar with the brake system now and feel fairly confident working on them!
Thanks for the tips.
Pete1958
Members
Hi, It might be a good idea to bleed the brakes anyway then at least you know that there is no air in the system and the fluid is new .
Start at the nearside front and work clockwise round the car.
Also give the bleed nipples a squirt of penetrating oil first.
.Start at the nearside front and work clockwise round the car.
Also give the bleed nipples a squirt of penetrating oil first.
Hey Pete, yep I will change the fluid and bleed them especially since I've had a 5 litre bottle of brake fluid sitting in my room for 2 months!
Thanks for tip, I was actually confused with the order as the Honda guide says start from passenger side, but am sure its recommended to do the side where the master cylinder is first. I will need some cap covers for the bleed nipples as mine seem to have perished or are perishing. So I ordered these: http://www.ebay.co.uk/itm/NEW-RUBBER-GREASE-NIPPLE-CAPS-DUST-CAPS-BLEED-SCREW-COVERS-x-5-/290816066191?pt=LH_DefaultDomain_3&hash=item43b5fd028f
Hopefully those will fit! Honda want roughly £3.50 for each!
the slider/caliper bolt from ebay at £15 should be fine, you worry to much...maybe at that price is not the same quality as hondas one but it's better than you have now, after you ruined 1/2?
if you grease them and tight correct- no problemo amigo!
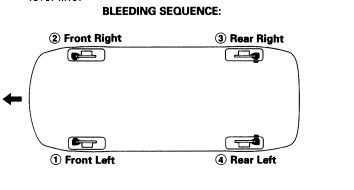
also the correct bleeding for the brake system is next:
1. the nearest bleeding from the clutch master brake
2. next the opposites rear
3. again the front wheel opposites the first one bleed
4. the rear one, last!
when you bleed you want the old stuff to get out not to circulate through the hole system, so, take my advice!
if you grease them and tight correct- no problemo amigo!
also the correct bleeding for the brake system is next:
1. the nearest bleeding from the clutch master brake
2. next the opposites rear
3. again the front wheel opposites the first one bleed
4. the rear one, last!
when you bleed you want the old stuff to get out not to circulate through the hole system, so, take my advice!
Pete1958
Members
As there seems to be multiple correct ways to bleed first i.e. further to nearest or vice versa or on the same line front left,rear right then opposite the official way for the 6th Gen is
As I said Andy
.
I do worry too much! Ended up buying it from Honda, would of been good to try out the aftermarket ones, but hey ho.
Andy that's the one I was looking at from the manual. But unless I'm reading wrong it says first one is left side, whereas the master cylinder is closest to the right, so Its a bit confusing!
Also note to self; when changing gearbox fluid, remove the wheel for easier access to gearbox filler plugs and level car out!
Oh also to note with the OEM caliper pins they provide it with a satchet of TRW 32-932-966 grease for the pins, I ***umed they are silicone type. In two minds whether to use these or the red rubber grease that I have.