What's new

Rust

tunstall

Members
Messages
48
Reaction score
8
Location
Staffordshire
Car
Honda Accord Tourer
Now that the weather is improving (hopefully) and we have more daylight hours I want to tackle rust that has started to appear on the near-side inner rear wheel arch of my 2005 Tourer. To do this properly I want to remove the inner wheel arch plastic insert so that I can sort out the rust from the covered area too.
My question is - has anyone ever removed the plastic cover inside the wheel arch and if so is it easy, difficult, a pain in the derriere?
Any useful tips, comments will be useful.
Thank you.
 
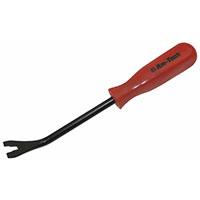
I'd invest in a trim removal tool before you start, it'll make the job removing the retaining clips a whole lot easier without damaging or destroying them. There's a knack to it that I'm sure you can work out, you need to be able to lever out or unscrew the locking centre then lever out the whole clip with the removal tool.


No doubt you'll also need a decent rust converter...plenty of those out there.
 
This is something i want to tackle this year.My arches are good so i want to keep them that way by cleaning and greasing behind lips.I had a half ***ed go at liner removal last year but looked tricky so decided to leave it.I might be wrong but im sure theres a couple of bolts to remove as well as clips?
 
I'd invest in a trim removal tool before you start, it'll make the job removing the retaining clips a whole lot easier without damaging or destroying them. There's a knack to it that I'm sure you can work out, you need to be able to lever out or unscrew the locking centre then lever out the whole clip with the removal tool.


No doubt you'll also need a decent rust converter...plenty of those out there.
Many thanks for the info- I'll get hold of the tool from my local ECP, and download the manual.
 
Yes, it looks to be tricky but if I leave it it's going to get worse. The car is in very good condition for its age and I want to keep it a bit longer.

That's not why I suggested you leave it. Unless you know exactly what you're doing, you'll make it worse in the long run by disturbing it. Guess how I know that ... :)
 
This is something i want to tackle this year.My arches are good so i want to keep them that way by cleaning and greasing behind lips.I had a half ***ed go at liner removal last year but looked tricky so decided to leave it.I might be wrong but im sure theres a couple of bolts to remove as well as clips?

Yes there's a bit of mixture but even if you break a few because they were damaged on removal, rusted in or whatever you can buy replacements very easily and if you have to run the car without the inner plastic arch no harm done in fact you're probably better off without it considering how much crap they can trap. I don't remember removal of inner cover being a particularly tricky job it's just you've got find all the fasteners and as you say they're not all the same.

arch2.jpgArch1.jpg
 
Last edited:
That's not why I suggested you leave it. Unless you know exactly what you're doing, you'll make it worse in the long run by disturbing it. Guess how I know that ... :)
Yes, thanks again - I ***ume you know because you've tried to do it. I can see that removing the plastic cover will be difficult, but if I can at least get to the rusted area and treat it with deruster etc. I'll be happy. I'll let you know how I go on - or don't!!!
 
Yes there's a bit of mixture but even if you break a few because they were damaged on removal, rusted in or whatever you can buy replacements very easily and if you have to run the car without the inner plastic arch no harm done in fact you're probably better off without it considering how much crap they can trap. I don't remember removal of inner cover being a particularly tricky job it's just you've got find all the fasteners and as you say they're not all the same.

View attachment 483View attachment 484
Many thanks for the diagram - that helps a lot. I jacked the car up yesterday, removed the wheel/tyre, cleaned all the dried mud/dust from the plastic cover and noted where all the fittings are. I do have a variety of these screws etc. from my former car - Civic Aerodeck, and if I break any at least I can replace them. I'm familiar with the clips too and know from experience how they fit. The diagram is brilliant, showing all the fittings. Thank you so much for that. I have a few items to buy before I will tackle the job - stonechip paint etc. and will keep an eye on the weather!
 
I've done it recently, it is easy, at the bottom of the liner, front and rear are screws, then around the liner are plastic plugs. Ease the centre out of the plugs and the body will come out.
Unfortunately the corrosion starts between the inner and outer skin and any rust treatment on existing rust will prove a temporary measure. So, if you have the dreaded bubbling the only sure way is removal of rusted metal which usually means new part or full outer arches. I have just done this on mine and repainted the rear 1/4 and rear door, it was my trade so fortunately little cost, but it would be expensive in a body shop.
 
the only sure way is removal of rusted metal which usually means new part or full outer arches. I have just done this on mine and repainted the rear 1/4 and rear door, it was my trade so fortunately little cost, but it would be expensive in a body shop.
where did you get your arches from? a mere year ago klokkerholm, van vezel and other suppliers could not source rear arches and oem was the only option, so I had to do pie cuts to an L profile plate and weld it all back together, I'm 90% happy with it, but I've recently bought two from a polish seller on ebay and it's just as thick as oem at a fraction of the cost, it is also cheaper than klokkerholm and van vezel but they originate from the same source

dunno what to do yet though, replace again and do it proper or use the new arches as a base for box flares....... time will tell :p
 
I've had some success tackling the rust on my aged Sprinter van. After removing the rust I first treated the affected areas with Jenolite.
Later I applied an epoxy resin over these areas before sanding and spraying over them.
No signs of rust coming back through and it's been well over a year now.
 
where did you get your arches from? a mere year ago klokkerholm, van vezel and other suppliers could not source rear arches and oem was the only option, so I had to do pie cuts to an L profile plate and weld it all back together, I'm 90% happy with it, but I've recently bought two from a polish seller on ebay and it's just as thick as oem at a fraction of the cost, it is also cheaper than klokkerholm and van vezel but they originate from the same source

dunno what to do yet though, replace again and do it proper or use the new arches as a base for box flares....... time will tell :p
On ebay there is a company in Lithuania, it's complete 1/4 panels and was just over £100 for both sides, so I've loads of spare metal to play with.
 
I've had some success tackling the rust on my aged Sprinter van. After removing the rust I first treated the affected areas with Jenolite.
Later I applied an epoxy resin over these areas before sanding and spraying over them.
No signs of rust coming back through and it's been well over a year now.
That's interesting, I have a job to do on my mates van above the windscreen, I may well give that a go.;).
 
I had some rust on the rear wheel arch last year, before the mot I sanded it down a bit, filled it with metal putty, sanded it down, bit of primer and a little bit of paint on top, took about hour and a year later still looks ok lol that metal putty is good stuff!
 
Well I'm glad that worked for you Rob, it's something I've never tried, I must keep that in mind.;)
 
Top