Rusty-nail
New Member
- Messages
- 27
- Reaction score
- 1
- Car
- Accord 2.2 iDTEC EX
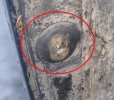
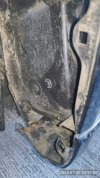
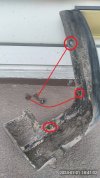
This is what I'm trying to prevent
FYI
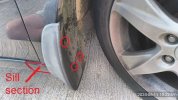
Today I cleaned the sill behind the front right mudflap.
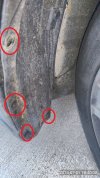
11 years of dirt accumulation removed.
There was quite a lot of dirt came out.
I flushed it out with a garden hose with the nozzle removed.
Steps I took:
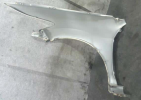
I had to remove the mudflap.
3 philips headed screws hold it in place.
They were very difficult to unscrew.
The top screw I damaged the head. I then used a 'damaged screw head' removal tool called grabit pro but it failed to budge the screw.
I cut a new slot in the head with a hacksaw blade but it still would not budge.
I eventually removed it after holding a soldering iron on the head for 90 seconds followed by immediately unscrewing. The heat softened the plastic (into which the screw is screwed into) enough to loosen the bond between the threads and the plastic.
The mudflap was then removed.
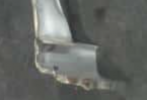
Behind the mudflap is the wheel arch liner.
This is held in place by the mudflap's screw 'sockets'
I tried to remove these 3 screw sockets but they would not budge. I suspect they are some kind of 'bayonett' fitting. So I left them in place.
Above the highest mudflap screw is a plastic clip. I was able to remove this clip without breaking it (gently prised it out with a flat head screwdriver.
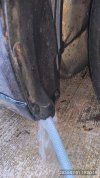
With the clip removed I was able to pull the wheel arch liner away from the metal arch bodywork and insert the garden hose.
I then turned on the hose 100% and jiggled it up and down for a few minutes.
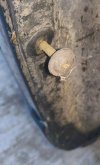
While the hose was running I pulled at the bottom of the plastic lining and this allowed chunks of dirt to escape.
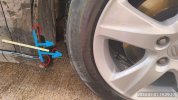
After a few minutes rinsing I inserted the hose at the bottom of the lining (see pic) and repeated.
Bits of leaves and mud were rinsed out.
I'm going to see if I can source the 3 of the thingy the screw goes into.
I can then break them out and fully remove the liner for further inspection/cleaning followed by some Bilt Hamber cavity spray.
If anyone knows the part number for the screw 'socket/ thingys please let me know.
Thanks
FYI
Today I cleaned the sill behind the front right mudflap.
11 years of dirt accumulation removed.
There was quite a lot of dirt came out.
I flushed it out with a garden hose with the nozzle removed.
Steps I took:
I had to remove the mudflap.
3 philips headed screws hold it in place.
They were very difficult to unscrew.
The top screw I damaged the head. I then used a 'damaged screw head' removal tool called grabit pro but it failed to budge the screw.
I cut a new slot in the head with a hacksaw blade but it still would not budge.
I eventually removed it after holding a soldering iron on the head for 90 seconds followed by immediately unscrewing. The heat softened the plastic (into which the screw is screwed into) enough to loosen the bond between the threads and the plastic.
The mudflap was then removed.
Behind the mudflap is the wheel arch liner.
This is held in place by the mudflap's screw 'sockets'
I tried to remove these 3 screw sockets but they would not budge. I suspect they are some kind of 'bayonett' fitting. So I left them in place.
Above the highest mudflap screw is a plastic clip. I was able to remove this clip without breaking it (gently prised it out with a flat head screwdriver.
With the clip removed I was able to pull the wheel arch liner away from the metal arch bodywork and insert the garden hose.
I then turned on the hose 100% and jiggled it up and down for a few minutes.
While the hose was running I pulled at the bottom of the plastic lining and this allowed chunks of dirt to escape.
After a few minutes rinsing I inserted the hose at the bottom of the lining (see pic) and repeated.
Bits of leaves and mud were rinsed out.
I'm going to see if I can source the 3 of the thingy the screw goes into.
I can then break them out and fully remove the liner for further inspection/cleaning followed by some Bilt Hamber cavity spray.
If anyone knows the part number for the screw 'socket/ thingys please let me know.
Thanks
Attachments
Last edited: