What's new

Changing a clutch master cylinder

Troy McClure

Member
Messages
33
Reaction score
7
Location
Somerset
Car
20013 Accord i-DTEC
I started by replying to an old thread where people had given up changing their clutch master cylinder, but thought I might start a new thread for anyone looking to do it. Apologies there aren't more photos - I struggled with this over three days on and off and photos were the last thing on my mind. Reckon I could do it in a few hours now I know what to do though. Expect to alternate between hands and knees outside the car, lying on your side reaching with your left hand, right hand holding the roof of the car and lying on your back with your head in the pedal box. You may consider removing the driver's seat (disconnect the battery negative first to avoid SRS issues when you disconnect the airbag connector), but I managed with the seat moved all the way back, albeit with a lot of bruises. This seemed a simple job but I've had easier engine removals tbh.

My symptoms: First, the clutch was squeaky. Then while holding on the clutch for any length of time in traffic, I noticed the biting point got closer to the floor to the point I almost stalled a couple of times. Suspected a small internal leak. No loss of fluid but it was very black and bitty in the reservoir suggesting the seals in master or slave or both were failing. I've had a couple of occasions in my life where I've had to continue my journey with no clutch but I'm not a student any more; I ordered both just in case. Master: ABE F94006ABE (about £45), Slave: Ashika 85-04-412 (just under £25).

slave.jpeg

1. Drain the fluid, at least from the top half of the system by attaching a siphon tube to the bleed valve on the slave cylinder (marked in red). Open the cover of the reservoir, run the tube to a suitable container, crack the bleed open (8mm) and wait. If your clutch pedal still works, you can pump it to speed up the process. You'll want the clutch reservoir empty at least, plus probably the same again to avoid too much leakage - DOT 4 brake fluid strips paint so wash away any spills quickly.

reservoir plus new master.jpeg

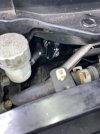
2. Remove the strut brace (three nuts each side) and the clutch reservoir mounting bracket to give you space to reach in there - there's a hose held by a couple of clips to the strut brace that you can tuck under the engine cover to keep it out of your way. Photo shows master cylinder, reservoir and pipe clipped to strut brace in foreground.

3. Remove the trim under the dash and on the side of the centre console to the left of the clutch pedal. Both are just held by clips; the one under the dash has a connector for the blue footwell LED.

clutch pedal credit 146 fossil .jpeg

4. There are two 12mm nuts in the footwell that hold the master cylinder in place. The one in the 5 o'clock position is easy to get to with a UJ and extension (wrap the UJ in insulation tape to limit its movement to help position it on the nut), the one at 11 o'clock is a little trickier..... Circled in red in the photo (credit: 146 Fossil).
 

Attachments

  • reservoir plus new master.jpeg
    reservoir plus new master.jpeg
    175.7 KB · Views: 1
C steel.jpeg

5. There's a C shaped steel tubular section that's going to get in the way of everything. It's held by four bolts, two each side and you'll need to disconnect the inertia switch (marked in red).

***CAUTION***

If you try to start the engine with the inertia switch disconnected, the car will think you've crashed, the engine won't start, it cuts the power to various systems leading to multiple fault codes (Engine, Traction Control, TSA, SRS, Body Electrical, Instrument Display, ABS...) and you'll need a diagnostic tool to reset the ECU. If you mishandle it, eg catch it with your ratchet handle or drop it, it may trip, leading to similar issues when you come to start the car again. This time the ECU won't reset.....

Don't panic like I did; there's a reset button on the top of it under the rubber cover, now you can reset the fault codes. Recommend you press that reset button just in case after reinstallation before you turn on the ignition, especially if you don't have a decent diagnostic tool. Alternatively, unscrew it from the bracket (two crosshead screws that you can reach with a stubby screwdriver) and gently tie it up out of the way.

Actuator.jpeg

6. To get access to that second nut, you'll need to remove the actuator for the climate control to the left of the clutch pedal. Unplug the green connector and remove the three 8mm hex head/crosshead screws (marked in red). The one closest to the firewall you'll need to depress the clutch pedal to reach. If you've drained the system it will spring to the floor. There is also a crosshead screw (marked in blue) holding a bit of ducting that you can remove to give a bit more room and a white polythene pipe you can push out of the way. A flexi socket or screwdriver extension is useful here. Wriggle the actuator free - don't force it as there's a greased channel in the back of it that a lug sits in on a lever that pulls a cable and you don't want to dislodge everything.

7. Finally you can see that second master cylinder nut. I reached it with a 12mm long socket, a UJ wrapped in tape and two 1/4" extensions. A 1/2" UJ wont fit in there, a 3/8" might be best, but I don't have a 3/8" socket set.

8. There's a cotter pin linking the clutch pedal to the master cylinder push rod, secured with an R clip on the left side. You'll find it almost impossible to reach without undoing the 12mm bolt holding the top of the clutch pedal bracket. Removing this will enable you to pull it all away from the centre console so you can reach up and pull the clip out, then push out the cotter pin. Note the head of the cotter pin has flat edges which sit in the shape on the push rod end of the master cylinder. The whole bracket will now be slack - suspend it gently from the clutch switch wiring or rest the pedal on a scissor jack in the footwell.

8. Under the bonnet, pop the hydraulic hose out of a couple of clips on the firewall to give a bit of slack and you can now move the master cylinder towards you a bit so you can reach in to either remove the staple holding the hydraulics in place by working it with a screwdriver or undo the union - you'll need a 10mm line spanner and a spanner to hold the union - two spanners in a tight space and I couldn't get enough torque on it so I removed the staple. There may be a bit of fluid leakage. Keep the staple for the new part.

Reassembly is the reverse of disassembly.

9. Clean out the reservoir and transfer it to the new part. If you undid the union nut, transfer it and secure with the staple. Set the push rod end to the same length as the original so your pedal travel is about right and tighten the lock nut finger tight.

***CAUTION***

Once that lock nut is set, you'll not be able to get at it again except maybe with your fingers. My pedal travel is now much too great so I think I'll have to do the whole job again, just to adjust the push rod after tightening that lock nut with a spanner....

Install the new master cylinder through the firewall. The pushrod is on a ball joint so is free to rotate - the shaped side which supports the cotter pin head goes on the left as you look from under the bonnet, on the right as viewed from the inside. I used a woodworking clamp to hold the master cylinder against the firewall, pressing it against one of the engine cover pegs but you could also wedge it with a piece of wood or similar.

10. The scissor jack in the footwell helps support the pedal bracket as you fit it over the studs of the new master cylinder. Line up the pedal with the push rod end (the flat side sits outside the pedal on the left), grease up the cotter pin (I used ball joint grease) and insert it. I gave up trying to get the R clip in and used a couple of locking wires to prevent the cotter pin working its way out (this after refitting almost everything and then having to take it all apart again after finding the clip, only to fail). Maybe I should have transferred the push rod end from the old part or at least squeezed it a bit before reassembly but I couldn't get the clip through the hole. Would be bad enough on the bench but doing it blind while on my back in the footwell, no chance. Another reason I may have to start the whole job again.

11. Fit the two nuts and one bolt to secure the pedal bracket (the nuts onto the studs of the new master cylinder, plus the top bolt) and tighten as much as you can. The UJs wrapped in tape really help here.

12. Under the bonnet, clip the hydraulic line back into the firewall clips. If you're connecting the whole union, push it into the new master cylinder and push the staple in from the left. I used water pump pliers to drive it home. Refit the reservoir bracket, strut brace and clip the hose back to the strut brace.

13. Now fit the climate control actuator, ensuring the peg sits in the channel, plug in the green connector, then reattach that bit of ducting, then the C shaped tube. Remember, don't turn on the ignition until you've at least reconnected that inertia switch and consider pressing the reset just in case too.

14. Now, finally, you can fill and bleed the system. Fill the reservoir with new DOT 4 brake fluid, and use the clutch pedal to pump fluid through to the bleed nipple on the slave cylinder - the pedal will spring to the floor as there's little resistance so you'll need to do it by hand, collecting the fluid in a suitable container. Keep topping up the reservoir. Once the fluid is clean, I found the best way was to route the siphon tube back to the reservoir and weigh it down, then pump like mad until there were no bubbles in the tube. Close the bleed nipple and remove the siphon tube, first from the reservoir to avoid siphoning, then from the bleed nipple. Be ready to catch the fluid from the tube. If you don't like the idea of recycling the fluid this way, then you can easily replace it and discard the 'old' fluid later.

15. Check the pedal. If it feels spongy or springs to the floor, bleed some more. If all feels good, go for a gentle test drive.

Done. Got a feeling that after that the Slave will be easy. Maybe next week when the bruises and grazes have healed...
 
Last edited:
Top