DIY 8th Gen iDtec Diesel Fuel Filter Change
Just changed my diesel fuel filter on my 8th Gen iDtec and below is a description on how I did it. I approached this with a lot of trepidation but in hind sight it was not as difficult as I first feared.
1. Make sure you have at least 5 litres of diesel in the tank to enable proper bleeding once complete.
2. Disconnect positive from battery. Make sure you have access to your security code as you will need this once the system is reconnected.
3. Removed the cross member.
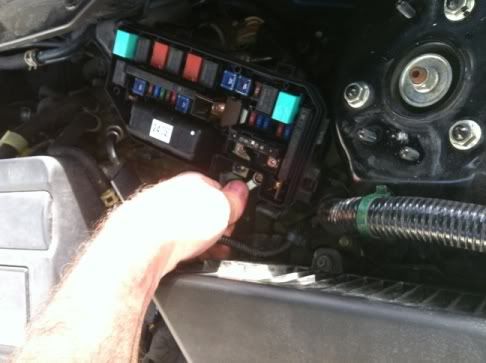
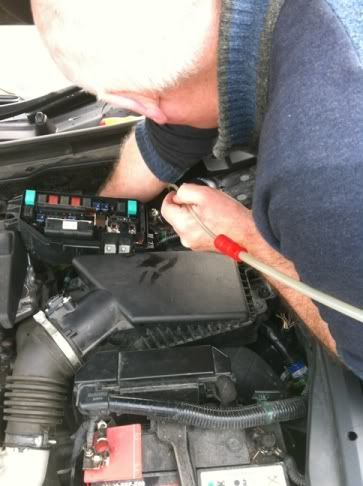
4. Create some room to get at the filter by moving the fuse box to the side. Undo the nut holding the fuse box. Opened the fuse box and removed the 2 input wires thus allowing the fuse box to be put to one side out of the way.
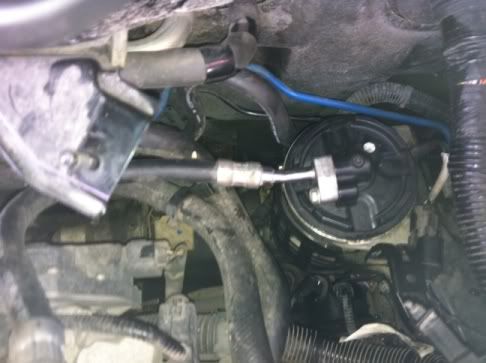
5. Remove the top bolt holding the fuel pipe to the top of the filter and pull the fuel pipe out. Have a cloth ready to catch any fuel spillage.
6. Next unscrew the top of the filter cover. Here you have 2 choices in how to do this.
Option one is to buy the specific Honda tool which is about £60. This would make it very easy.
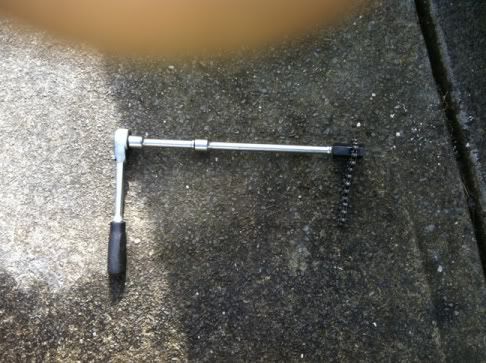
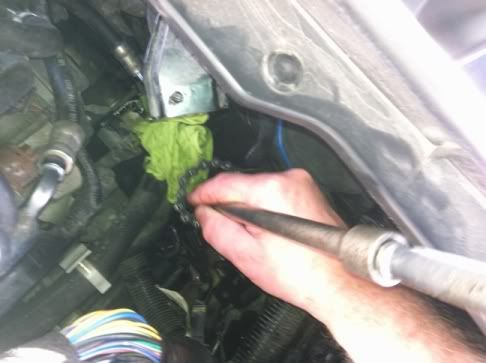
Option two is to use a chain oil filter wrench, a ratchet and a long extension. Like this one http://www.tooled-up.com/Product.asp?PID=20713 The chain is wrapped carefully around the top of the filter cover and the ratchet is turned until the filter unscrews. It makes it easier to have two people doing this. One to place the chain on the correct position (around the top of the filter cover) and ensure it does not move around and the other to turn the ratchet. We worked carefully to ensure there was no damage done to the filter housing but the filter cover unscrewed easy enough. Be careful when working together not to get any fingers caught as it can lead to an outbreak of swearing!!!!
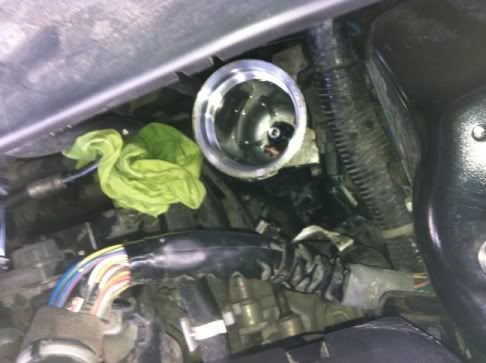
7. Once the filter is removed the filter housing must be drained. Again two options;
Option one is to drain the filter via the drain plug at the bottom of the filter. This can be accessed by jacking up the car, put on axle stands, remove wheel, put car on left lock on wheel and use a spanner and hose to drain the filter via the drain plug.
Option two (the one we used) is to suck the fuel out of the filter using a pump. Makes the job very easy. Clean inside of fuel filter with a cloth if there is any dirt.
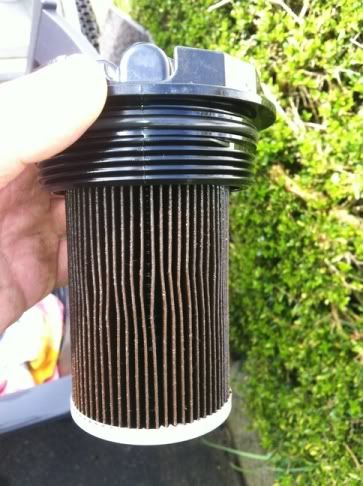
8. Got the filter from a Honda dealer, only Honda parts going into my machine. Coat the new O ring in some fuel and replace the old ones. Two O rings come in the kit, one for the filter cover and the other for the drain plug. Replace the old ones with new ones. Pull the old filter out and put the new filter in.
9. Put the filter cover and new filter back into the housing and screw.
10. Using the same technique as 6 above to tighten the cover. An arrow on the filter cover points to a notch on the housing when correctly tightened.
11. Replace the fuel pipe and bolt in.
12. Replace the wires in the fuse box (making sure the correct wires go into the correct slot) and tighten. Replace cover and put fuse box back in position.
13. Replace and bolt on the cross member.
14. Turn on ignition to III (but do not start) and leave the pump prime and bleed the system. I turned the key to III and left for 50 seconds and did this twice. You can hear the pump priming the fuel system.
15. Once primed I started the engine and she started first time. Checked for leaks and took her for a spin. Happy days!!
My initial thought’s was that this was going to be a nightmare (judging from the i-CDTI forums) but it was not too difficult at all. The only real tricky bit was removing the fuel filter cover and with two guys and a bit of patience it worked out fine.
Just changed my diesel fuel filter on my 8th Gen iDtec and below is a description on how I did it. I approached this with a lot of trepidation but in hind sight it was not as difficult as I first feared.
1. Make sure you have at least 5 litres of diesel in the tank to enable proper bleeding once complete.
2. Disconnect positive from battery. Make sure you have access to your security code as you will need this once the system is reconnected.
3. Removed the cross member.
4. Create some room to get at the filter by moving the fuse box to the side. Undo the nut holding the fuse box. Opened the fuse box and removed the 2 input wires thus allowing the fuse box to be put to one side out of the way.
5. Remove the top bolt holding the fuel pipe to the top of the filter and pull the fuel pipe out. Have a cloth ready to catch any fuel spillage.
6. Next unscrew the top of the filter cover. Here you have 2 choices in how to do this.
Option one is to buy the specific Honda tool which is about £60. This would make it very easy.
Option two is to use a chain oil filter wrench, a ratchet and a long extension. Like this one http://www.tooled-up.com/Product.asp?PID=20713 The chain is wrapped carefully around the top of the filter cover and the ratchet is turned until the filter unscrews. It makes it easier to have two people doing this. One to place the chain on the correct position (around the top of the filter cover) and ensure it does not move around and the other to turn the ratchet. We worked carefully to ensure there was no damage done to the filter housing but the filter cover unscrewed easy enough. Be careful when working together not to get any fingers caught as it can lead to an outbreak of swearing!!!!
7. Once the filter is removed the filter housing must be drained. Again two options;
Option one is to drain the filter via the drain plug at the bottom of the filter. This can be accessed by jacking up the car, put on axle stands, remove wheel, put car on left lock on wheel and use a spanner and hose to drain the filter via the drain plug.
Option two (the one we used) is to suck the fuel out of the filter using a pump. Makes the job very easy. Clean inside of fuel filter with a cloth if there is any dirt.
8. Got the filter from a Honda dealer, only Honda parts going into my machine. Coat the new O ring in some fuel and replace the old ones. Two O rings come in the kit, one for the filter cover and the other for the drain plug. Replace the old ones with new ones. Pull the old filter out and put the new filter in.
9. Put the filter cover and new filter back into the housing and screw.
10. Using the same technique as 6 above to tighten the cover. An arrow on the filter cover points to a notch on the housing when correctly tightened.
11. Replace the fuel pipe and bolt in.
12. Replace the wires in the fuse box (making sure the correct wires go into the correct slot) and tighten. Replace cover and put fuse box back in position.
13. Replace and bolt on the cross member.
14. Turn on ignition to III (but do not start) and leave the pump prime and bleed the system. I turned the key to III and left for 50 seconds and did this twice. You can hear the pump priming the fuel system.
15. Once primed I started the engine and she started first time. Checked for leaks and took her for a spin. Happy days!!
My initial thought’s was that this was going to be a nightmare (judging from the i-CDTI forums) but it was not too difficult at all. The only real tricky bit was removing the fuel filter cover and with two guys and a bit of patience it worked out fine.
