What's new

Few issues

riot68

Members
Messages
116
Reaction score
0
Location
Nottinghamshire
Car
2.4 type s tourer
My sister just got herself a nice 2001 2.0 SE, seems very tidy for the price she paid however has a few little things i'd like to sort for her.

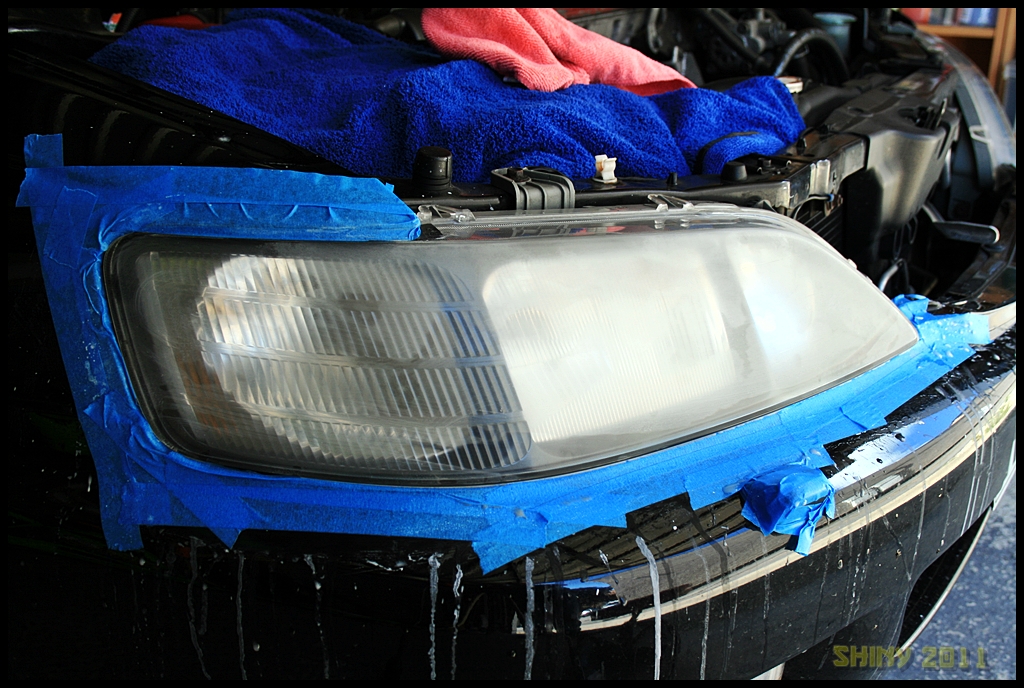
The front lights have a cloudly look to them, seems to be just scratching to the front plastic, is this curable and if so what's the best way, could you polish them?

The a/c climate buttons all work and everything works on auto etc. however it doesn't get cold so the actual a/c function doesn't work, am hoping it will just be a regas but wanted to check if there were any known issues with them, a starting place to look kind of thing?

Last one I just posted about in another thread too, the boot wheel well was full of water, have drained and tried so maybe the end of it, however again wanted to check if there were any known issues, the nearside rear light has some condensation in it so was wondering if it's getting in behind the light. Are they easy enough to remove and have a check?

thanks...
 
For the front lights you can try a bit of polish / t-cut / colour restorer type thing. That took the majority of the baked on grime off mine. After that I've read that toothpaste works, then lastly an extremely fine sandpaper and cutting compound - there is a thread on here about someone doing it this way and the lights came up beautifully.

As for the wheel well, there is a recent thread on here where the spare wheel nut being missing is the culprit. Or it could just be that these cars are over 10 years old now, the rubber seals are going/gone and the water/condensation is just settling on the lowest point of the car.

A/C - could just be a regas. Again there is a thread on here on how to check if there is gas in the system by looking at the little view finder on the air con pump (I think) - o/s/f of the engine bay by the washer bottle. The window is a circular peeve of glass about 10mm, it will be coated in engine grime so will need a rub clean. Just mind your fingers on the fans if the engine is running - without thinking I put my hand in to clean it with the engine running and then the cooling fan kicked in and I was body lucky not to lose the tips!

It could also be that the system wasn't used by the previous owner, hence seals or pipes will have degraded and need to be replaced. That's not cheap, I had one pipe split and the bill came to £350 with the regas.

NTH
 
Exactly what Colin said dude. Great response dude.
 
My headlights are foggy too. It appears to be internal aswell. Does anyone know if the lenses are removable? With the bonnet open I can see about three clips on the tops of each headlight, but haven't dared trying to pull them apart yet!
 
Agree with all the above. Polishing will bring the headlights back to life.
The air-con has a known issue with the pump discharge hose. It is the one that sits at the front of the engine bay on the right hand side as you look at the engine. It curves up and over and has a habit of leaking at the join behind the radiator. Get this checked before putting in more gas.
It is the hose in box 3 >>Here<<
 
Thank you all so much for the quick responses, I'll get her to bring it around this week and I'll go over everything. One of the guys on the MR2 owners club who's had some Accords said something about a sunroof drainage tube that runs down to the back, he thought this may be causing the water in the boot?...
 
Forgot to say, spare wheel nut in place (well snapped off now as was rusted so bad when I undid it to take the spare out it sheared), will check all the seals in day light and get some silicon on them, works a treat on the MR2 tbar seals to rejuvenate. Cheers again...
 
My headlights are foggy too. It appears to be internal aswell. Does anyone know if the lenses are removable? With the bonnet open I can see about three clips on the tops of each headlight, but haven't dared trying to pull them apart yet!

You can separate the "glass" from the housing, but I don't think you will ever get a good seal again. If I remember correctly Marcus (93 Accord) did a thread where he split his lights to coat the glass, that may be worth a search.

I thought the inside of mine was foggy so I dutifully removed the bumper and disconnected all of the electrics etc then tried to wash the inside - only to find that with a bit of t-cut and some elbow grease it was actually on the outside.

I've heard that it is usually caused from the headlight washers being used when the lights are on.
 
I've heard that it is usually caused from the headlight washers being used when the lights are on.

Can't be the case with my sisters, they look pretty bad but she doesn't have headlight washers :D am going to try the t-cut, have some g3 too and some 3M expensive finishing compound, my MR2 rear lights came up very well with this...
 
Good advice there! Re doing the insides of the lights, I am a bit worried about disturbing the seal. Something AcesHigh mentioned. I worry that in the long run, condensation might get in and give me a bigger problem. I'd never thought of using Autosol! Might give that a go next! I had a quick go at mine with a product called Fenwicks Windowize, which is intended for polishing plastic caravan windows. Seemed to take the worst off, but with the weather being so cold, I only gave each one a quick rub over. Another product I've heard of is PlastX by Meguiars. I've heard some good things about that on other forums. Has anyone tried it on theirs?
 
Here's my lights -

Cloudy -

Lightpolish02.JPG


Wetsand with fine paper (1500 grit followed by 2500 grit)-

Lightpolish09.JPG


Which then leaves with you this :eek:

Lightpolish10.JPG


Polished with a cutting pad and Gtechniq P1 polish-

Lightpolish13.JPG


Finished with a polishing pad and P1

Lightpolish19.JPG


Cleaned & Sealed

Lightpolish21.JPG


Job done!

Lightpolish25.JPG


I've a leaky boot. I will strip the boot lining out and send my lad in with a torch and then pour water over the back of the car to see where it could be coming from. Most likely is the rear lights, but it could be the rear window seal or boot seal, but they look pretty intact.

If your aerial is on the wing, that could be another culprit.
 
I had a leaky boot on my accord i used to have i took the back of the light of and then poured cups of water slowly over and around the light and found that were 2 metal panels meet on inner skin were it has a paste looking join was a very very small part open so sealed it up and was dry from then on but it did take me lots of looking and doing my head in trying to work out how my boot was filling up....
 
Hey Shiny

Nice Howto!!!, my lights are pretty much in the same condition aswell.

Can I ask what you used to seal it?

cheers


Andy
 
I used chemical guys v7 spray sealant, but any sealant or wax should do the job. When I wax or seal the car, I include the lights as well to help protect them.
 
My spare wheel well (apt name) is always puddled with water - Thanks for the tips Folks, must go looking on Sat!

P.S. I needed to remove the bolt anchoring the spare last time with a hammer and vise grips due to rust ont he threads, any idea where I'd get a replacement, guessing the ones in breakers yards will be as bad.....Would ya find them on ebay etc?
 
just not overplay with sandpaper. headlight top glass is not very think. only few milimeters so you can make a hole after sometime :D
i used only polishing disk and handdrill and some wax which is used for polishing first time after car was resprayed. it took me 2 minutes to do the job
 
cheers for all the great advise. She's just had the timing belt done and an oil change, think we need to do the rear brakes, discs and pads, is this an easy job? I know on my own gen7 the rear callipers just swing up for the pads and were a 10 minute job...
 
If brake caliper are Ok then you can do it in a half an hour, each. and it can take half a day if they needs to be reassembled/repaired. but you need special tool to press caliper cylinder back to its place and some special grease to lubricate caliper bracket. something to clear rust from bearing ***y and from bracket...
 
cheers for all the great advise. She's just had the timing belt done and an oil change, think we need to do the rear brakes, discs and pads, is this an easy job? I know on my own gen7 the rear callipers just swing up for the pads and were a 10 minute job...


The rear pistons on the 6th gen needs to be wound back, obviously you could try and bodge it with some tool you have - personally that would be a pain for me so I bought the correct tool from the off. http://www.amazon.co.uk/Laser-1314-Caliper-Piston-Re-wind/dp/B002V72SHS/ref=sr_1_3?ie=UTF8&qid=1327011463&sr=8-3

To get the discs off another tool, this is pretty much a must-have, is an impact driver to use on the two disc retaining screws per side...I got mine from Halfords, don't know if one brand vs price is better than another. http://www.halfords.com/webapp/wcs/stores/servlet/product_storeId_10001_catalogId_10151_productId_530655_langId_-1_categoryId_165469

I usually just undo both bolts, clean and regrease the slide pins with rubber grease. Wire brush the the caliper carrier aswell, particularly where the brakes sit. When you go to wind back the piston, you'll notice two notches on it. This is where the tool catches and turns it back. These notches also need to run horizontally once wound back . This vid is pretty close

 
interesting.Why these notches needs to be horizontally? i didn't pay attention when I changed pads
 
Apparently its to line up with the guide on the back of the brake pad.

'guide'
IMG_1769t.jpg


'notches'
IMG_1770t.jpg


'installed'
IMG_1772t.jpg
 
Ok sorted thanks, have a wind back tool, need to get an impact driver, seen some cheap on eBay but Halfords one looks good, will pick one up soon.One questions, the guy on the video says use silicone paste, is the red rubber grease the same thing? cheers...
 
Ok sorted thanks, have a wind back tool, need to get an impact driver, seen some cheap on eBay but Halfords one looks good, will pick one up soon.One questions, the guy on the video says use silicone paste, is the red rubber grease the same thing? cheers...

The Halfords impact driver is from the pro range so comes with the lifetime warranty, although it might cost a couple of quid more than others and for the sake of convenience I just got it from there.

I doubt its the same thing chemically (but I don't know for sure), I tried to find the silicone paste but had some difficulty and went for red rubber grease which can also be used...its mainly to protect the rubber boot by preventing other grease such as copper reacting with it.

I have a tub of copper and red and just use two 1" smallish paint brushes, one for each grease to apply. I store the brushes in self-seal freezer bags seperately to prevent any grit etc getting into them when sitting in the shed/toolbag

Forgot to say...I opened the bleeder to reverse the piston in using ETGC's method in the vid rather than force it all the way back into the reservoir. It seems to have prevented any air in the system from what I can feel.
 
Right think I got it all sorted in my head, cheers for sharing the video, i'm a visual person so seeing what folks are on about really helps, sure I could do it now. Did you make a up a 'Mountain Dew' bottle fliud catcher?...
 
Right think I got it all sorted in my head, cheers for sharing the video, i'm a visual person so seeing what folks are on about really helps, sure I could do it now. Did you make a up a 'Mountain Dew' bottle fliud catcher?...


Yes!! with a lucozade sport bottle :lol:, although might replace with a jar as it tends to topple with a slight breeze, and a one man brake bleeder hose...this was only a fiver so rather than risk damage or air in the braking system I just got it.

http://www.ebay.co.uk/itm/VIZIBLEED-ONE-MAN-BRAKE-CLUTCH-BLEEDING-TOOL-NEW-/130602687974?pt=UK_Hand_Tools_Equipment&hash=item1e6886dde6#ht_1236wt_1037
 
Nice one, will pick one up and save the next jar too, the need to get a clamp.

this was the impact driver I saw, very cheap though, maybe too cheap...

http://www.ebay.co.uk/itm/190615788383?ssPageName=STRK:MEWAX:IT&_trksid=p3984.m1423.l2649
 
Top